DriveTrain Subsystem
This tab contains the thought process of developing a simple DriveTrain subsystem. Most people start with a differential drive type drivetrain to start learning actual FRC programming. I will start a Command-based project from scratch, so there will be no blanks to fill in terms of knowledge. There will also be some comments explaining some more in-depth thought processes that are going to appear in most drivetrain related projects.
Note: This DriveTrain uses only falcons for driving. It is different for other types of motors; this is on purpose. You will not be able to find answers to every single task you will have just by looking up the docs. You need to learn the ideas behind it here and then be able to apply it anywhere.
Make sure you have 2022 of WPILib and create a new command-based project. When you do that you should end up with a file tree like the one shown.
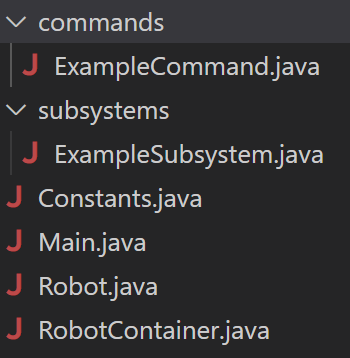
There are some unneeded things in this file tree. First of all, ExampleCommand.java and ExampleSubsystem.java will not be used. However, first, we need to remove all references to those files so we remain errorless in the files we do want to keep. To do that, let's first move to RobotContainer. Hopefully we know that all Subsystems and controllers are declared in RobotContainer. It is where we set up all our commands too. When we first start this project, the only references to ExampleCommand.java and ExampleSubsystem.java will be in RobotContainer. This is RobotContainer before we remove unneeded lines of code:
// Copyright (c) FIRST and other WPILib contributors.
// Open Source Software; you can modify and/or share it under the terms of
// the WPILib BSD license file in the root directory of this project.

package frc.robot;

import edu.wpi.first.wpilibj.GenericHID;
import edu.wpi.first.wpilibj.XboxController;
import frc.robot.commands.ExampleCommand;
import frc.robot.subsystems.ExampleSubsystem;
import edu.wpi.first.wpilibj2.command.Command;

/**
 * This class is where the bulk of the robot should be declared. Since Command-based is a
 * "declarative" paradigm, very little robot logic should actually be handled in the {@link Robot}
 * periodic methods (other than the scheduler calls). Instead, the structure of the robot (including
 * subsystems, commands, and button mappings) should be declared here.
 */
public class RobotContainer {
  // The robot's subsystems and commands are defined here...
  private final ExampleSubsystem m_exampleSubsystem = new ExampleSubsystem();

  private final ExampleCommand m_autoCommand = new ExampleCommand(m_exampleSubsystem);

  /** The container for the robot. Contains subsystems, OI devices, and commands. */
  public RobotContainer() {
    // Configure the button bindings
    configureButtonBindings();
  }

  /**
   * Use this method to define your button->command mappings. Buttons can be created by
   * instantiating a {@link GenericHID} or one of its subclasses ({@link
   * edu.wpi.first.wpilibj.Joystick} or {@link XboxController}), and then passing it to a {@link
   * edu.wpi.first.wpilibj2.command.button.JoystickButton}.
   */
  private void configureButtonBindings() {}

  /**
   * Use this to pass the autonomous command to the main {@link Robot} class.
   *
   * @return the command to run in autonomous
   */
  public Command getAutonomousCommand() {
    // An ExampleCommand will run in autonomous
    return m_autoCommand;
  }
}
This will be our new RobotContainer AFTER we remove unneeded things:
// Copyright (c) FIRST and other WPILib contributors.
// Open Source Software; you can modify and/or share it under the terms of
// the WPILib BSD license file in the root directory of this project.

package frc.robot;

import edu.wpi.first.wpilibj.GenericHID;
import edu.wpi.first.wpilibj.XboxController;

// Note the removal of both ExampleCommand and ExampleSubsystem imports.
// We will not need them anymore because we wont be using them.
// You can just delete them.

// import frc.robot.subsystems.ExampleSubsystem;
// import frc.robot.commands.ExampleCommand;

import edu.wpi.first.wpilibj2.command.Command;
import edu.wpi.first.wpilibj2.command.InstantCommand;

/**
 * This class is where the bulk of the robot should be declared. Since Command-based is a
 * "declarative" paradigm, very little robot logic should actually be handled in the {@link Robot}
 * periodic methods (other than the scheduler calls). Instead, the structure of the robot (including
 * subsystems, commands, and button mappings) should be declared here.
 */
public class RobotContainer {
  // The robot's subsystems and commands are defined here...

  // You can just remove these. I have commented them out instead to show
  // that they used to exist here.

  // private final ExampleSubsystem m_exampleSubsystem = new ExampleSubsystem();

  // private final ExampleCommand m_autoCommand = new ExampleCommand(m_exampleSubsystem);


  /** The container for the robot. Contains subsystems, OI devices, and commands. */
  public RobotContainer() {
    // Configure the button bindings
    configureButtonBindings();
  }

  /**
   * Use this method to define your button->command mappings. Buttons can be created by
   * instantiating a {@link GenericHID} or one of its subclasses ({@link
   * edu.wpi.first.wpilibj.Joystick} or {@link XboxController}), and then passing it to a {@link
   * edu.wpi.first.wpilibj2.command.button.JoystickButton}.
   */
  private void configureButtonBindings() {}

  /**
   * Use this to pass the autonomous command to the main {@link Robot} class.
   *
   * @return the command to run in autonomous
   */
  public Command getAutonomousCommand() {
    // because we removed m_autoCommand when we deleted it, this is going to error.
    // Instead, we can replace it with an empty InstantCommand.
    // InstantCommands are commands that run one method once. Therefore,
    // an empty InstantCommand will not run any code. This is just a placeholder
    // for when we want to add an actual auto command.
    return new InstantCommand();
  }
}
Now we can remove both ExampleCommand.java and ExampleSubsystem.java from our file tree. Since we removed all references to them in our RobotContainer, that means that this will not cause any errors and we wont have to worry about it anymore. Lets move directly to creating a DriveTrain subsystem. To do that, we will right click the Subsystem folder on the file tree and then click the bottom option from the tab that says "Create a new class/command" and then select Subsystem.
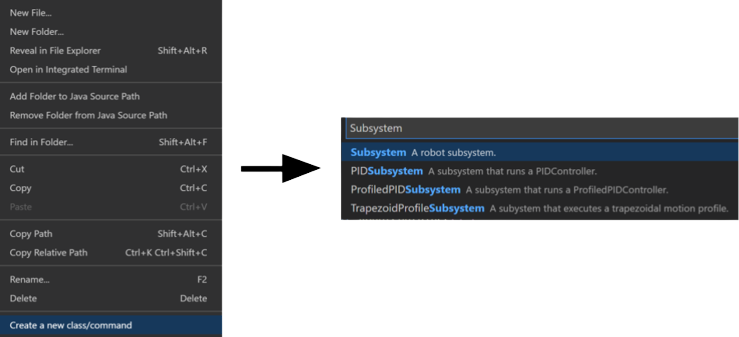
This will create your new subsystem. It should look a little like this:
// Copyright (c) FIRST and other WPILib contributors.
// Open Source Software; you can modify and/or share it under the terms of
// the WPILib BSD license file in the root directory of this project.

package frc.robot.subsystems;

import edu.wpi.first.wpilibj2.command.SubsystemBase;

public class DriveTrain extends SubsystemBase {
  /** Creates a new DriveTrain. */
  public DriveTrain() {}

  @Override
  public void periodic() {
    // This method will be called once per scheduler run
  }
}
First what we have to do is create the proper structure so we can more easily control the flow of the code. Here are the sections that I like to add:
// Copyright (c) FIRST and other WPILib contributors.
// Open Source Software; you can modify and/or share it under the terms of
// the WPILib BSD license file in the root directory of this project.

package frc.robot.subsystems;

import edu.wpi.first.wpilibj2.command.SubsystemBase;

public class DriveTrain extends SubsystemBase {
  /** Creates a new DriveTrain. */
  public DriveTrain() {}

  // For when we initalize all our parts.
  public void initialize() {}

  // To configure all the parts that we have initalized beforehand.
  public void config() {}

  // Method to add all the testing parts to Shuffleboard or SmartDashboard.
  public void enableTesting() {}

  @Override
  public void periodic() {
    // This method will be called once per scheduler run
  }
}
Now we can write all the instance variables into our class. I am also going to call on all these methods. We want to call on initalize first so we can get our parts, and then we want to configure them. Usually, we have four motors. We are using falcons so I will declare four falcon motors. This is our new class:
// Copyright (c) FIRST and other WPILib contributors.
// Open Source Software; you can modify and/or share it under the terms of
// the WPILib BSD license file in the root directory of this project.

package frc.robot.subsystems;

import com.ctre.phoenix.motorcontrol.can.WPI_TalonFX;

import edu.wpi.first.wpilibj2.command.SubsystemBase;

public class DriveTrain extends SubsystemBase {
  final boolean is_testing = true;

  WPI_TalonFX leftMotorOne;
  WPI_TalonFX leftMotorTwo;

  WPI_TalonFX rightMotorOne;
  WPI_TalonFX rightMotorTwo;

  /** Creates a new DriveTrain. */
  public DriveTrain() {
    initialize();

    config();

    if (is_testing) {
      enableTesting();
    }
  }

  public void initialize() {}

  public void config() {}

  public void enableTesting() {}

  @Override
  public void periodic() {
    // This method will be called once per scheduler run
  }
}
Next I am going to finish those declarations in the initialize() function. To do that though, I am going to have to declare the motor IDs in Constants. I want to have different IO (In/Out) sections in my Constants, so I will start with just an IO sub-class and then nest a different DRIVE_IO sub-class in the IO sub-class. This all takes place within the Constants class. Usually it has nothing declared.
// Copyright (c) FIRST and other WPILib contributors.
// Open Source Software; you can modify and/or share it under the terms of
// the WPILib BSD license file in the root directory of this project.

package frc.robot;

/**
 * The Constants class provides a convenient place for teams to hold robot-wide numerical or boolean
 * constants. This class should not be used for any other purpose. All constants should be declared
 * globally (i.e. public static). Do not put anything functional in this class.
 *
 * <p>It is advised to statically import this class (or one of its inner classes) wherever the
 * constants are needed, to reduce verbosity.
 */
public final class Constants {
    public static final class IO {
        public static final class DRIVE_IO {
            // Left side motor ids
            public static final int LEFT_ONE = 1;
            public static final int LEFT_TWO = 2;
            // Right side motor ids
            public static final int RIGHT_ONE = 3;
            public static final int RIGHT_TWO = 4;
        }
    }
}// Copyright (c) FIRST and other WPILib contributors.
// Open Source Software; you can modify and/or share it under the terms of
// the WPILib BSD license file in the root directory of this project.
package frc.robot.subsystems;
import com.ctre.phoenix.motorcontrol.can.WPI_TalonFX;
// Import the nested class so we can just do DRIVE_IO.MOTOR_ID;
import frc.robot.Constants.IO.DRIVE_IO;
import edu.wpi.first.wpilibj2.command.SubsystemBase;
public class DriveTrain extends SubsystemBase {
final boolean is_testing = true;
WPI_TalonFX leftMotorOne;
WPI_TalonFX leftMotorTwo;
WPI_TalonFX rightMotorOne;
WPI_TalonFX rightMotorTwo;
/** Creates a new DriveTrain. */
public DriveTrain() {
initialize();
config();
if (is_testing) {
enableTesting();
}
}
public void initialize() {
leftMotorOne = new WPI_TalonFX(DRIVE_IO.LEFT_ONE);
leftMotorTwo = new WPI_TalonFX(DRIVE_IO.LEFT_TWO);
rightMotorOne = new WPI_TalonFX(DRIVE_IO.RIGHT_ONE);
rightMotorTwo = new WPI_TalonFX(DRIVE_IO.RIGHT_TWO);
}
public void config() {}
public void enableTesting() {}
@Override
public void periodic() {
// This method will be called once per scheduler run
}
}Now we have declared our motors. Our motors have to be organized somehow, however. We can't just have them "out in the open"; they need to be wrapped in a greater collection so we can use them together. To do that, we use the MotorControllerGroup which essentially just groups together motors. Here is the instance variable and declaration for that:
// Copyright (c) FIRST and other WPILib contributors.
// Open Source Software; you can modify and/or share it under the terms of
// the WPILib BSD license file in the root directory of this project.

package frc.robot.subsystems;

import com.ctre.phoenix.motorcontrol.can.WPI_TalonFX;

import frc.robot.Constants.IO.DRIVE_IO;
import edu.wpi.first.wpilibj.motorcontrol.MotorControllerGroup;
import edu.wpi.first.wpilibj2.command.SubsystemBase;

public class DriveTrain extends SubsystemBase {
  final boolean is_testing = true;

  WPI_TalonFX leftMotorOne;
  WPI_TalonFX leftMotorTwo;
  WPI_TalonFX rightMotorOne;
  WPI_TalonFX rightMotorTwo;

  // declares motor controller groups so we can control multiple motors at the same time.
  MotorControllerGroup left;
  MotorControllerGroup right;

  /** Creates a new DriveTrain. */
  public DriveTrain() {
    initialize();

    config();

    if (is_testing) {
      enableTesting();
    }
  }

  public void initialize() {
    leftMotorOne = new WPI_TalonFX(DRIVE_IO.LEFT_ONE);
    leftMotorTwo = new WPI_TalonFX(DRIVE_IO.LEFT_TWO);

    rightMotorOne = new WPI_TalonFX(DRIVE_IO.RIGHT_ONE);
    rightMotorTwo = new WPI_TalonFX(DRIVE_IO.RIGHT_TWO);

    // sets the left motor controller group to the collection of the first left motor and the second left motor.
    left = new MotorControllerGroup(leftMotorOne, leftMotorTwo);
    // does the same as the left group but for the right.
    right = new MotorControllerGroup(rightMotorOne, rightMotorTwo);
  }

  public void config() {}

  public void enableTesting() {}

  @Override
  public void periodic() {
    // This method will be called once per scheduler run
  }
}
Now that's done, we need to group all four motors together into a DifferentialDrive instance. This allows us to directly take Joystick values and pass them right into the collection of motors.
// Copyright (c) FIRST and other WPILib contributors.
// Open Source Software; you can modify and/or share it under the terms of
// the WPILib BSD license file in the root directory of this project.

package frc.robot.subsystems;

import com.ctre.phoenix.motorcontrol.can.WPI_TalonFX;

import frc.robot.Constants.IO.DRIVE_IO;
import edu.wpi.first.wpilibj.drive.DifferentialDrive;
import edu.wpi.first.wpilibj.motorcontrol.MotorControllerGroup;
import edu.wpi.first.wpilibj2.command.SubsystemBase;

public class DriveTrain extends SubsystemBase {
  final boolean is_testing = true;

  WPI_TalonFX leftMotorOne;
  WPI_TalonFX leftMotorTwo;
  WPI_TalonFX rightMotorOne;
  WPI_TalonFX rightMotorTwo;

  MotorControllerGroup left;
  MotorControllerGroup right;

  // Declare our drive.
  DifferentialDrive drive;

  /** Creates a new DriveTrain. */
  public DriveTrain() {
    initialize();

    config();

    if (is_testing) {
      enableTesting();
    }
  }

  public void initialize() {
    leftMotorOne = new WPI_TalonFX(DRIVE_IO.LEFT_ONE);
    leftMotorTwo = new WPI_TalonFX(DRIVE_IO.LEFT_TWO);

    rightMotorOne = new WPI_TalonFX(DRIVE_IO.RIGHT_ONE);
    rightMotorTwo = new WPI_TalonFX(DRIVE_IO.RIGHT_TWO);

    left = new MotorControllerGroup(leftMotorOne, leftMotorTwo);
    right = new MotorControllerGroup(rightMotorOne, rightMotorTwo);

    // set our drive to a DifferentialDrive with the left and right motor groups as the collection.
    drive = new DifferentialDrive(left, right);
  }

  public void config() {}

  public void enableTesting() {}

  @Override
  public void periodic() {
    // This method will be called once per scheduler run
  }
}
Okay. All of that is what we call "boilerplate"; there is no logic present and is just filler so we can control the subsystem. Now, we have to add methods to actually control the motors. For it to work, we need to somehow get Joystick input to the DifferentialDrive. First, we need to add a method that uses a built-in DifferentialDrive method to control the MotorControllerGroups.
// Copyright (c) FIRST and other WPILib contributors.
// Open Source Software; you can modify and/or share it under the terms of
// the WPILib BSD license file in the root directory of this project.

package frc.robot.subsystems;

import com.ctre.phoenix.motorcontrol.can.WPI_TalonFX;

import frc.robot.Constants.IO.DRIVE_IO;
import edu.wpi.first.wpilibj.drive.DifferentialDrive;
import edu.wpi.first.wpilibj.motorcontrol.MotorControllerGroup;
import edu.wpi.first.wpilibj2.command.SubsystemBase;

public class DriveTrain extends SubsystemBase {
  final boolean is_testing = true;

  WPI_TalonFX leftMotorOne;
  WPI_TalonFX leftMotorTwo;
  WPI_TalonFX rightMotorOne;
  WPI_TalonFX rightMotorTwo;

  MotorControllerGroup left;
  MotorControllerGroup right;

  DifferentialDrive drive;

  /** Creates a new DriveTrain. */
  public DriveTrain() {
    initialize();

    config();

    if (is_testing) {
      enableTesting();
    }
  }

  public void initialize() {
    leftMotorOne = new WPI_TalonFX(DRIVE_IO.LEFT_ONE);
    leftMotorTwo = new WPI_TalonFX(DRIVE_IO.LEFT_TWO);

    rightMotorOne = new WPI_TalonFX(DRIVE_IO.RIGHT_ONE);
    rightMotorTwo = new WPI_TalonFX(DRIVE_IO.RIGHT_TWO);

    left = new MotorControllerGroup(leftMotorOne, leftMotorTwo);
    right = new MotorControllerGroup(rightMotorOne, rightMotorTwo);

    drive = new DifferentialDrive(left, right);
  }

  public void config() {}

  public void enableTesting() {}

  public void joystickInput(double y_value, double twist_value) {
    drive.arcadeDrive(y_value, twist_value);
  }

  @Override
  public void periodic() {
    // This method will be called once per scheduler run
  }
}
You will notice about this code that we "port" (move) our joystick values -> a method named arcadeDrive(). The method arcadeDrive() takes two arguments: a front and back motion value and a rotation value. The "y_value" part is basically going to be a number between 1 and -1. If it is one, then the robot will move forward at 100% speed. The "twist_value" part is also a number between 1 and -1 and determines how fast you rotate left or right. The actual names of the arguments refer to which part of the joystick is being used; the y_value is technically the forward and back motion of the Joystick. Our joysticks have a twist which is perfect for rotation, therefore we have the names y_value and twist_value.
Now, we have to add some way to actually get those Joystick values. We will create a new command (usually we do not use commands to port joystick inputs and just use a perpetual InstantCommand, but for example sake) that takes in a Joystick and our DriveTrain as inputs.
// Copyright (c) FIRST and other WPILib contributors.
// Open Source Software; you can modify and/or share it under the terms of
// the WPILib BSD license file in the root directory of this project.

package frc.robot.commands;

import edu.wpi.first.wpilibj.Joystick;
import edu.wpi.first.wpilibj2.command.CommandBase;
import frc.robot.subsystems.DriveTrain;

public class Drive extends CommandBase {
  Joystick joy;
  DriveTrain drive;

  /** Creates a new Drive. */
  public Drive(Joystick joy, DriveTrain drive) {
    this.joy = joy;
    this.drive = drive;

    addRequirements(drive);
  }

  // Called when the command is initially scheduled.
  @Override
  public void initialize() {}

  // Called every time the scheduler runs while the command is scheduled.
  // The Joystick class comes with methods to get the Y value and to get the Twist value. Therefore,
  // we are just going to get those values and constantly execute this method to
  // get those values into the DriveTrain.
  @Override
  public void execute() {
    drive.joystickInput(joy.getY(), joy.getTwist());
  }

  // Called once the command ends or is interrupted.
  @Override
  public void end(boolean interrupted) {}

  // Returns true when the command should end.
  @Override
  public boolean isFinished() {
    return false;
  }
}
We are almost done now. Our final step is connecting the Command we have created to the Subsystem we have created. To do that, we want to connect our command as the DriveTrain's "default command" meaning it will always run as long as no other commands are running that require the DriveTrain subsystem. To do that, we are going to edit RobotContainer to initialize our DriveTrain, a joystick (to determine your Joystick port number, open up Driver Station and see which device is green. Whatever number it is, put it where I put 0 for the Joystick.) and then set a new Drive command to be the default command of the DriveTrain subsystem.
// Copyright (c) FIRST and other WPILib contributors.
// Open Source Software; you can modify and/or share it under the terms of
// the WPILib BSD license file in the root directory of this project.

package frc.robot;

import edu.wpi.first.wpilibj.GenericHID;
import edu.wpi.first.wpilibj.Joystick;
import edu.wpi.first.wpilibj.XboxController;
import edu.wpi.first.wpilibj2.command.Command;
import edu.wpi.first.wpilibj2.command.InstantCommand;
import frc.robot.commands.Drive;
import frc.robot.subsystems.DriveTrain;

/**
 * This class is where the bulk of the robot should be declared. Since Command-based is a
 * "declarative" paradigm, very little robot logic should actually be handled in the {@link Robot}
 * periodic methods (other than the scheduler calls). Instead, the structure of the robot (including
 * subsystems, commands, and button mappings) should be declared here.
 */
public class RobotContainer {
  // The robot's subsystems and commands are defined here...
  public final Joystick joy = new Joystick(0);

  private final DriveTrain drive = new DriveTrain();

  /** The container for the robot. Contains subsystems, OI devices, and commands. */
  public RobotContainer() {
    // Configure the button bindings
    configureButtonBindings();
    drive.setDefaultCommand(new Drive(joy, drive));
  }

  /**
   * Use this method to define your button->command mappings. Buttons can be created by
   * instantiating a {@link GenericHID} or one of its subclasses ({@link
   * edu.wpi.first.wpilibj.Joystick} or {@link XboxController}), and then passing it to a {@link
   * edu.wpi.first.wpilibj2.command.button.JoystickButton}.
   */
  private void configureButtonBindings() {}

  /**
   * Use this to pass the autonomous command to the main {@link Robot} class.
   *
   * @return the command to run in autonomous
   */
  public Command getAutonomousCommand() {
    // because we removed m_autoCommand when we deleted it, this is going to error.
    // Instead, we can replace it with an empty InstantCommand.
    // InstantCommands are commands that run one method once. Therefore,
    // an empty InstantCommand will not run any code. This is just a placeholder
    // for when we want to add an actual auto command.
    return new InstantCommand();
  }
}
That is it! You essentially just created a new DriveTrain that has four motors and can be controlled using a joystick. Good job.