DisplayFilters
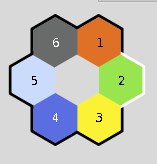
This image shows the original colors, with no filters applied.
Note that filters are only a visual effect, they do not alter the stored color. If you want to store the transformed color, you will need to pick it from the relevant part of the Gpick window. (for example, it's easy to pick the transformed swatch colors, since you can click-and-drag from the central cell to each of the surrounding cells to pick that color and add it to the palette)
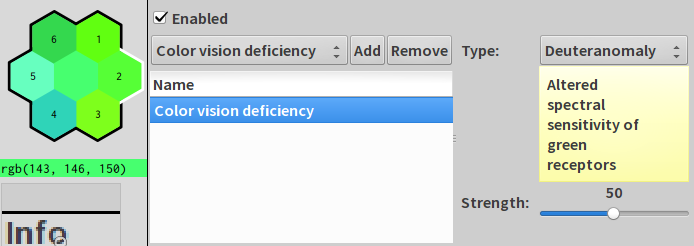
Simulates the various types of colorblindness. Has two options: Type, and Strength. Strength is expressed as a percentage. The examples here all use Strength=50.
Original:
Protanomaly / altered sensitivity to red:

Deuteranomaly / altered sensitivity to green:
Tritanomaly / altered sensitivity to blue:

Since this is getting rather long, here's the original again:
Protanopia / absense of red receptors:

Deuteranopia / absense of green receptors:

Tritanopia / absense of blue receptors:

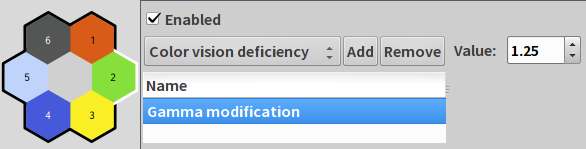
Useful if you need to check how colors will look on a screen with different gamma (handheld gaming systems and mobile phones, for example) Overall visual effect is to make all colors more saturated, or less saturated (according to whether the gamma value you chose was above 1.0 or below 1.0). This effectively increases or reduces contrast.
Original:
Gamma 0.8:

Gamma 1.25:
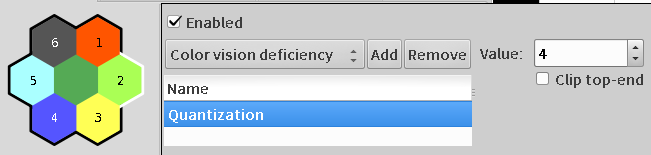
Divides the intensity range up into N equal steps. For each component, snaps the intensity to the nearest step.
Has two options, 'Steps' and 'Clip top end'.
For example, If the number of steps is 3, then the locations of the 'steps' are (0, 128, 255). For the color (89, 125, 206) (#597dce in hex code), 89 and 125 are nearest to 128, while 206 is nearest to 255. So the output color is (128, 128, 255) (#8080ff in hex code).
Useful for assisting creative color choice by reducing the pool of available colors, and for simulating how colors will appear on 2d game system hardware.
Original:
Steps=4:
Steps=3:

Steps=4 with "Clip Top" enabled:

You can see here that the smaller the number of steps, the more saturated the result tends to be. The '3 steps' output is more vivid than either the original or the '4 steps'. The '4 steps' is still more vivid than the original -- for example, comparing the red color, the transformed color has 100% saturation, while the original only has 74%.
The '4 steps with Clip Top' illustrates that Clip Top removes the 'hottest' colors -- you still get 4 steps, but the highest step is not full intensity.
'Clip top end' is an option that omits the 'highest' intensity, while adjusting the step locations so you still have the same number of steps. For example, with Steps=3 and 'Clip top end' enabled, (0, 85, 170) are the steps used. These are the first 3 steps used when 'Steps=4' and 'Clip top end' is off -- in general, the result is like adding one to the number of steps but preventing the usage of the highest intensity level. For older game systems that displayed on a TV, this was used to avoid 'hot' colors that the TV couldn't handle.
Super Nintendo, for example, was exactly equivalent to Steps=32 with 'Clip top end' enabled, resulting in the following step locations:
(0, 8, 16, 24, 32, 40, 48, 56, 64, 72, 80, 88, 96, 104, 112, 120, 128, 135, 143, 151, 159, 167, 175, 183, 191, 199, 207, 215, 223, 231, 239, 247)
Whereas 15bit color used in SVGA computer displays was equivalent to Steps=32 with 'Clip top end' disabled, giving these step locations instead:
(0, 8, 16, 25, 33, 41, 49, 58, 66, 74, 82, 90, 99, 107, 115, 123, 132, 140, 148, 156, 165, 173, 181, 189, 197, 206, 214, 222, 230, 239, 247, 255)
'Clip top end' can be helpful if you are trying to avoid blowing out the brightness of your highlight colors.
This is a list of quantization settings which match a known console / computer system.
- Amstrad CPC: Steps=3
- EGA 256k version: Steps=4
- Sega Master System: Steps=4 Clip_Top
- Sega Genesis/ Megadrive : Steps=8 Clip_Top
- TurboGrafx16 : Steps=8
- Amiga OCS (4096 colors): Steps=16
- Sega GameGear (4096 colors): Steps=16
- Amstrad CPC+: Steps=16
- SVGA 15bit (32768 colors): Steps=32
- SNES (32768 colors): Steps=32 Clip_Top
- GBA (32768 colors): Steps=32
- VGA 18bit (262144 colors): Steps=64
- Current 24bit/32bit displays : Steps=256 (which of course will have no visually apparent effect.)
These values are also compatible with the RGB limiter in http://code.google.com/p/grafx2, except that the 'Clip top end' option is not available.
See also (on Wikipedia):
- List of 8-bit computer hardware palettes
- List of 16-bit computer hardware palettes
- List of videogame consoles' palettes
Because you can use multiple filters at once, you can combine filters to preview a range of effects.
For example, combining different levels of protanopia, deuteranopia, and tritanopia to simulate a 'color cast', or adding Gamma to Quantization to more realistically simulate the undersaturated screens of certain handheld console systems.
Note that ordering matters in some cases: applying Gamma before Quantization is quite different than applying Gamma after Quantization. You can drag and drop items in the 'Display filters' dialog to reorder them.