
Internal card setup (INT slot) for RG350 and RG280 consoles. Result of a collaboration project of Team RParadise formed by:
- Brumagix Gamer
- eduardofilo
- Juanmote (Juanma)
- La Retro Cueva
The setup is made based on the following parts:
- OpenDingux. Mainly thanks to pcercuei.
- SimpleMenu. Thanks to FGL82.
- RetroArch. The combination of OPK wrappers has been built with script RG3550_auto_ra_installer based on this definition file.
- Standalone applications:
- ColecoD. Thanks to alekmaul.
- Daphne. Thanks to DavidKnight247.
- FBA. Thanks to plrguez.
- JzIntv. Thanks to DavidKnight247.
- PCSX4All. Thanks to jdgleaver.
- ReGBA. Thanks to jdgleaver.
- Tac08. Thanks to 0xCAFED00D.
- VbEmu. Thanks to gameblabla.
- xMAME. Thanks to Slaanesh. Installed this settings interface.
- Commander. Thanks to glebm.
- PyBackup
- Download the dump file from the releases section of this repository.
- Flash the file (
img.gz) without decompressing with Balena Etcher on a microSD card of at least 4GB. - Mount the microSD in a computer. If we just flashed it, depending on the operating system, it may be necessary to remove it from the reader and reinsert it. In Windows, one of the two partitions containing the card will be mounted and the other will give an error. The error is normal since the second partition is Linux type.
- Place the kernel suitable to the console model. This can be done in several ways depending on the PC operating system.
-
Open the
select_kernel.batscript on the partition mounted correctly, by double clicking on it.
-
A console will appear where we will have to type the number corresponding to our console model from the list.

-
Press Return and, when prompted, eject the card safely.


-
Open a terminal and change the current directory to the path corresponding to partition 1 of the card (we can find out the mount point on our system with the
dfcommand). From that directory run the commandbash select_kernel.sh.
-
A dialog will appear inviting us to select our console model with the cursor keys.

-
Press Return and, when prompted, eject the card safely.


There is a third method valid for any operating system (Windows, Linux, Mac). The idea is to view partition 1 of the card with a file explorer and manually copy the two files in the directory corresponding to our console model to the root of that partition. Being a FAT32 partition, there should be no problem accessing the files from any system. Click on the following thumbnail to see a small video.
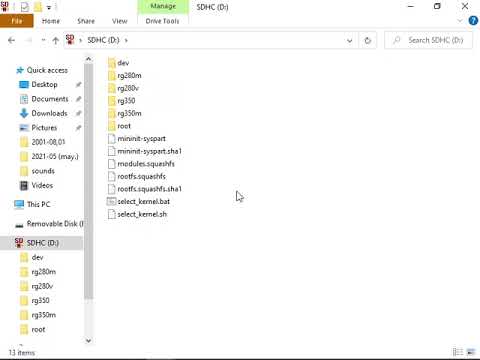
At this point, the card will be ready to work on the console model that we have selected in the previous procedure. If we have not already done yet, we will safely eject it from the PC and insert the card into the console slot marked with INT.
The above procedure can be repeated to change to another console model at any time. That is, the image is compatible with the four supported console models, so the same card will serve us for several machines.
Partition 2 contained in the image file has about 3.5GB (so it can be flashed without problems on cards with a capacity of 4GB or greater). During the first boot, this partition will expand to occupy all available space on the card.
The card that we have just prepared is empty of contents. It only contains the OpenDingux system, the SimpleMenu frontend, the RetroArch cores, and a few standalone emulators. All the configuration has been done with the idea that the contents are provided from the card that we will place in the slot marked with EXT.
Before continuing, we will make a brief comment on the legal considerations of installing such contents. The matter is complex. If you are interested, a good article is this Retro Game Corps post. Although there are few legal precedents on the subject, the problem primarily affects BIOS and ROMs. In a simplified way, it is usually considered that we can handle the ROMs of the games and the BIOS of the machines that we own. Actually it is more of a rule based on common sense, since as we say, there are few legal sentences on the subject and of course the opinion of the different participants in the industry is not consistent.
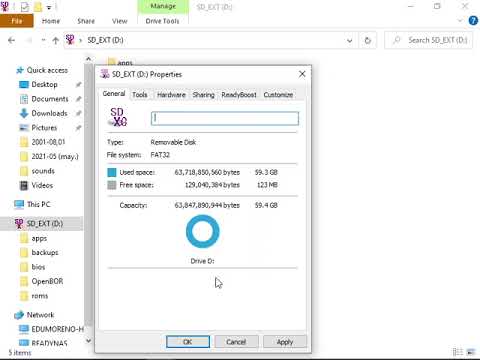
For all the preconfigured paths in the setup to work, the external microSD card needs to be in FAT32 format and NOT have label defined. In case of having a label, it will have to be removed.
In Windows we can do it from the Properties box of the unit where the external card is mounted. Click on the following thumbnail to see a small video.
In Linux it can be done by executing the following command from a terminal (in the example the device /dev/mmcblk0p1 has been used, but it will have to be replaced by the one that corresponds in our case):
sudo fatlabel /dev/mmcblk0p1 -rThe SimpleMenu frontend has been configured with a series of predefined paths where it will try to locate the ROMs and graphical previews. If we do not want to modify the SimpleMenu configuration, we will have to stick to these paths. In the table below, the name of the directory that will have to exist on the external card when we mount it on the PC is indicated in the second column. For example, in the following screenshot we can see the ROMs directory of the Game Boy system, which as we can see, is located next to all the others within the roms folder at the root of the card.

The above path on the PC will correspond to /media/sdcard/roms on the console system, once the card is in the console and the system has booted. In case of modifying the SimpleMenu configuration, or manually opening the emulators from GMenu2X, this will be the kind of path that we will use (/media/sdcard/roms/GB for Game Boy for instance).
Below is the table of the systems configured in SimpleMenu with the paths where we must place the ROMs and the supported extensions.
| System | Path | Supported extensions |
|---|---|---|
| MAME | roms/ARCADE | zip, 7z |
| Capcom Play System | roms/CPS | zip, 7z |
| Final Burn Alpha | roms/FBA | zip |
| Daphne | roms/DAPHNE | zip |
| Nintendo NES | roms/FC | zip, nes, 7z |
| Nintendo SNES | roms/SFC | smc, sfc, zip, 7z |
| Nintendo Virtual Boy | roms/VB | vb, vboy, bin, zip, 7z |
| SEGA SG-1000 | roms/SG1000 | zip, sg, 7z |
| SEGA Master System | roms/SMS | zip, sms, 7z |
| SEGA Megadrive | roms/MD | zip, bin, smd, md, 7z |
| SEGA CD | roms/SEGACD | bin, chd, 7z, zip |
| SEGA 32X | roms/32X | zip, 32x, 7z |
| Atari 2600 | roms/A2600 | bin, a26, 7z, zip |
| Atari 5200 | roms/A5200 | bin, a52, 7z, zip |
| Atari 7800 | roms/A7800 | bin, a78, 7z, zip |
| Inteillivision | roms/INTELLI | int |
| ColecoVision | roms/COLECO | rom, col |
| SNK Neo Geo | roms/NEOGEO | zip, 7z |
| NEC PC Engine | roms/PCE | pce, tg16, cue, 7z, zip |
| NEC PC Engine CD | roms/PCECD | pce, tg16, cue, chd, 7z, zip |
| Sony PlayStation | roms/PS | mdf, zip, pbp, cue, bin, img, ccd, sub, chd |
| Nintendo Game Boy | roms/GB | gb, gz, zip, 7z |
| Nintendo Game Boy Color | roms/GBC | gbc, zip, 7z |
| Nintendo Game Boy Advance | roms/GBA | gba, zip, 7z |
| Nintendo Game&Watch | roms/GW | mgw, zip, 7z |
| SEGA Game Gear | roms/GG | zip, gg, 7z |
| Atari Lynx | roms/LYNX | zip, lnx, 7z |
| SNK Neo Geo Pocket | roms/NGP | ngp, ngc, 7z, zip |
| WonderSwan | roms/WSC | ws, wsc, zip, 7z |
| Pokemon Mini | roms/POKEMINI | min, zip, 7z |
| Watara Supervision | roms/SUPERVISION | sv, bin, 7z, zip |
| Sinclair ZX Spectrum | roms/ZX | tzx, tap, z80, rzx, scl, trd, dsk, zip, 7z |
| Amstrad CPC | roms/AMSTRAD | dsk, sna, tap, cdt, voc, cpr, m3u, zip, 7z |
| Commodore 64 | roms/C64 | crt, d64, t64, bin, 7z, zip |
| MSX | roms/MSX | rom, ri, mx1, mx2, col, dsk, cas, sg, sc, m3u, zip, 7z |
| Commodore Amiga | roms/AMIGA | adf, adz, dms, fdi, ipf, hdf, hdz, lha, slave, info, cue, ccd, nrg, mds, iso, chd, uae, m3u, zip, 7z |
| Doom | roms/DOOM | wad, zip, 7z |
| Quake | roms/QUAKE | pak, zip, 7z |
| MS-DOS | roms/DOSBOX | zip, dosz, exe, com, bat, iso, cue, ins, img, ima, vhd, m3u, m3u8, 7z |
| ScummVM | roms/SCUMMVM | * |
| Pico8 | roms/PICO8 | png |
| TIC80 | roms/TIC80 | tic, 7z, zip |
The previews should be placed in a directory with name .previews within each of the ROM directories in the previous list. For example, the previews of GB should be located in roms/GB/.previews, this being the path from the root of the external card when mounted in the PC. The preview files have to be PNGs with the same name as the game (except for the extension).


If we have followed the paths indicated above, later in SimpleMenu the game will be represented as follows:

All the emulators installed in the image (RetroArch included) have redirected the paths where the BIOS should be to the bios directory on the external card. Similar to the case of ROMs, the bios directory at the root of the external card will correspond to the path /media/sdcard/bios on the console system.
Not all emulators need BIOS. This is the case of machines that did not have it or whose function has been emulated. The following is the BIOS file name and path where we will have to install it. To help identify the correct files, its size in bytes and an MD5 hash are indicated if it is known. The cases in which the BIOS is essential for the emulator to work are also marked. If 'NO' is indicated, the emulator will work, but still it is recommended to install the BIOS in order to achieve the best compatibility. To check MD5 hashes, the cross-platform utility Quickhash is recommended.
The sizes and hashes indicated are from BIOS that have been proven functional, but not necessarily the only possible ones. That is, in some machines there are several possible BIOS versions, usually because there have been several models of the machines (the case of the PlayStation being one of the most typical), or because someone has developed BIOS with improved capabilities (here the typical example is that of Neo Geo and his UNIBIOS).
| System | Path | Size | MD5 hash | Needed? |
|---|---|---|---|---|
| Atari 5200 | bios/5200.rom | 2048 | 281f20ea4320404ec820fb7ec0693b38 |
Yes |
| Atari 7800 | bios/7800 BIOS (U).rom | 0763f1ffb006ddbe32e52d497ee848ae |
No | |
| SEGACD | bios/bios_CD_E.bin | 131072 | e66fa1dc5820d254611fdcdba0662372 |
Yes |
| SEGACD | bios/bios_CD_J.bin | 131072 | 278a9397d192149e84e820ac621a8edd |
Yes |
| SEGACD | bios/bios_CD_U.bin | 131072 | 854b9150240a198070150e4566ae1290 |
Yes |
| Intellivision | bios/exec.bin | 8192 | 62e761035cb657903761800f4437b8af |
Yes |
| Intellivision | bios/grom.bin | 2048 | 0cd5946c6473e42e8e4c2137785e427f |
Yes |
| PC Engine CD | bios/syscard3.pce | 262144 | 390815d3d1a184a9e73adc91ba55f2bb |
Yes |
| Commodore Amiga | bios/kick34005.A500 | 262144 | 82a21c1890cae844b3df741f2762d48d |
Yes on Amiga 500 |
| Commodore Amiga | bios/kick37175.A500 | 524288 | dc10d7bdd1b6f450773dfb558477c230 |
Yes on Amiga 500+ |
| Commodore Amiga | bios/kick40063.A600 | 524288 | e40a5dfb3d017ba8779faba30cbd1c8e |
Yes on Amiga 600 |
| Commodore Amiga | bios/kick40068.A1200 | 524288 | 646773759326fbac3b2311fd8c8793ee |
Yes on Amiga 1200 |
| Commodore Amiga | bios/kick40060.CD32 | 524288 | 5f8924d013dd57a89cf349f4cdedc6b1 |
No |
| Commodore Amiga | bios/kick40060.CD32.ext | 524288 | bb72565701b1b6faece07d68ea5da639 |
No |
| Atari Lynx | bios/lynxboot.img | 512 | fcd403db69f54290b51035d82f835e7b |
Yes |
| Phillips Videopac | bios/o2rom.bin | 1024 | 562d5ebf9e030a40d6fabfc2f33139fd |
Yes |
| SNK Neo Geo | bios/neogeo.zip | 1950023 | 36241192dae2823eaf3bf464dde6dbc6 |
Yes on FBA, No on RetroArch |
| Nintendo GBA | bios/gba_bios.bin | 16384 | a860e8c0b6d573d191e4ec7db1b1e4f6 |
No, although recommended |
| PlayStation | bios/SCPH1001.BIN | 524288 | 924e392ed05558ffdb115408c263dccf |
No, although very recommended |
| Nintendo GB | bios/gb_bios.bin | 256 | 32fbbd84168d3482956eb3c5051637f5 |
No |
| Nintendo GBC | bios/gbc_bios.bin | 2304 | dbfce9db9deaa2567f6a84fde55f9680 |
No |
| Pokemon Mini | bios/bios.min | 4096 | 1e4fb124a3a886865acb574f388c803d |
Yes |
| MSX (BlueMSX) | bios/Machines/ | Yes | ||
| MSX (fMSX) | bios/MSX.ROM | 32768 | 364a1a579fe5cb8dba54519bcfcdac0d |
Yes on MSX |
| MSX (fMSX) | bios/MSX2.ROM | ec3a01c91f24fbddcbcab0ad301bc9ef |
Yes on MSX2 | |
| MSX (fMSX) | bios/MSX2EXT.ROM | 2183c2aff17cf4297bdb496de78c2e8a |
Yes on MSX2 | |
| MSX (fMSX) | bios/MSX2P.ROM | 32768 | 847cc025ffae665487940ff2639540e5 |
Yes on MSX2+ |
| MSX (fMSX) | bios/MSX2PEXT.ROM | 16384 | 7c8243c71d8f143b2531f01afa6a05dc |
Yes on MSX2+ |
Here are some cool shortcuts that can be used with the OpenDingux system, SimpleMenu, RetroArch, and standalone emulators.
| Context | Shorcut | Function |
|---|---|---|
| OpenDingux | POWER + START + SELECT | Reboot |
| OpenDingux | POWER + UP | Volume up |
| OpenDingux | POWER + DOWN | Volume down |
| OpenDingux | POWER + RIGHT | Brightness up |
| OpenDingux | POWER + LEFT | Brightness down |
| OpenDingux | POWER + B | Mouse mode (formerly POWER + L1) |
| OpenDingux | POWER + A | Hardware scaling ratio mode |
| OpenDingux | POWER + SELECT | Kill current app |
| OpenDingux | POWER + Y | Sleep mode (tap POWER to resume) |
| OpenDingux | POWER + X | take screenshot (on ~/screenshots) |
| OpenDingux | A (while powering on) | It'll skip the logo and show the output of the init scripts |
| SimpleMenu | Start | Brings up the Settings screen |
| SimpleMenu | Select | Rom options. Let's you select autolaunch, emulator (if multiple emulators are defined for the selected section) and overclocking |
| SimpleMenu | Up | Selects the previous game |
| SimpleMenu | Down | Selects the next game |
| SimpleMenu | Left | Skips to the previous page in the current section |
| SimpleMenu | Right | Skips to the next page in the current section |
| SimpleMenu | L1 | Switches to the previous section |
| SimpleMenu | R1 | Switches to the next section |
| SimpleMenu | L2 | Goes to the favorites section |
| SimpleMenu | R2 | Refreshes the current section (in case you added some ROMs while the menu is running) |
| SimpleMenu | A | Launches a game/program |
| SimpleMenu | Y | Switches between menu and fullscreen mode |
| SimpleMenu | X | On regular sections, marks a game as a favorite, on the favorites section, it takes it off from the favorites list |
| SimpleMenu | B | If pressed and released, it takes you to the section group selection screen. If pressed and held, it acts as a hotkey to be combined with other keys |
| SimpleMenu | B + Up | Skips to the previous letter |
| SimpleMenu | B + Down | Skips to the next letter |
| SimpleMenu | B + Left | Goes to the previous section, without showing the logo |
| SimpleMenu | B + Right | Goes to the next section, without showing the logo |
| SimpleMenu | B + Select | Random select |
| SimpleMenu | B + X | Deletes the selected rom WITHOUT ASKING FOR CONFIRMATION. Doesn't work on the favorites section or in the Apps and Games section |
| SimpleMenu | B + A | Launches the emulator itself instead of a rom, if it supports to be run as a standalone application |
| RetroArch | Select + A | Pause |
| RetroArch | Select + B | Reset |
| RetroArch | Select + X | RetroArch Menu |
| RetroArch | Select + Y | Fast forward |
| RetroArch | Select + R1 | Savestate save |
| RetroArch | Select + L1 | Savestate load |
| RetroArch | Select + R2 | Swap disc |
| RetroArch | Select + L2 | Open CD tray |
| RetroArch | Select + Start | Quit |
| RetroArch | Select + Left/Right | Change savestate slot |
| RetroArch | Select + Up/Down | Volume change |
| FBA (MAME, FBA y CPS) | L1 + R1 + Start or Power | Open emulator menu that allows us to quit |
| Neo Geo FBA RetroArch | A + B + Y | UniBIOS settings |
| xMAME | Select + L1 + R1 | Quit |
| Daphne | L1 | Insert coin |
| Daphne | Start | Start game |
| Daphne | Select | Quit |
| ReGBA (GBA) | Power or Select + Start | Open emulator menu that allows us to quit |
| PCSX4All (PlayStation) | Power or Select + Start | Open emulator menu that allows us to quit |
| JzIntv | Select | Open emulator menu that allows us to quit |
| JzIntv | Power | Quit |
| JzIntv | R1 | Virtual controller |
| JzIntv | L1 | Virtual keyboard |
| ColecoD (ColecoVision) | Select + Start | Open emulator menu that allows us to quit |
| Tac08 (PICO8) | Start | Open emulator menu that allows us to quit |
| Fuse (ZX Spectrum) | Select | Virtual keyboard |
| Cap32 (AMSTRAD CPC) | Y + Start | Virtual keyboard. Once displayed, open/close the RA menu (Select + X) so that the left stick starts working as a mouse |
| Vice 64 (Commodore 64) | Select | Virtual keyboard |
| PUAE (Commodores Amiga) | L1 | Virtual keyboard |
Some RetroArch cores show the following error screen when working in resolutions not supported by the system:

In this case proceed as follows:
-
Open RetroArch menu (
Select + X). -
Go to
Main Menu > Settings > Video > Scalingand checkInteger ScaleandKeep Aspect Ratiooptions.
-
Go to
Main Menu > Settings > Video > Video Filterand selectUpscale_256x-320x240.filtfilter (last on the list):


Finally, to not make this change every time you open the game, go to Main Menu > Quick Menu > Overrides and select Save Game Overrides.
Sometimes, when trying to exit RetroArch, it freezes and does not return to the frontend. In these cases, force close the application in the foreground (RetroArch at that moment) by pressing the shortcut Power + Select. It is important to press the keys in that order, that is, press Power a little before and without releasing it then press Select.
In the SimpleMenu configuration, many of the systems offer several emulator options, that is, you can choose between several emulators or RetroArch cores. Also the preferred emulator or core can be saved for each game.
In simple systems, such as 8-bit machines, only RetroArch has been configured, considering it the best option. But in more complex systems, such as arcade, the offer of emulators is wide. For example, in MAME, the following options are available:
- RetroArch MAME2003 core
- RetroArch MAME2003+ core
- FBA
- xMAME romset 84
- xMAME romset 69
- xMAME romset 52
The emulation options appear in this order in the list, the first being the default option if you do not manually specify an emulator for a specific game. Therefore, if left unchanged, the default option for running MAME games will be the MAME2003 RetroArch core.
If a specific game does not work with the default emulator, press Select in the SimpleMenu games list. A selector will appear with three options, the third one being the emulator to use. We will move to this third option and change the emulator by pressing left/right. To save the change we will press Select again. When opening the game by pressing A the emulator or RA core that we have chosen will be launched. If the new emulator is not working properly, try another option until you get good performance.


Another situation in which we should change the emulator option is when the game runs slow. In addition to the choppy sound, the best way to measure if the game is moving fast enough is to activate the frames per second or FPS counter. In RetroArch we can activate the option for a particular game in the menu Main Menu > Settings > On-Screen Display > On-Screen Notifications > Notification Visibility > Display Framerate, but if we want to activate it in general, we must first close the content that we are executing. This would be the procedure described in detail.
- Launch any game that runs with RetroArch (for example, all Handheld systems are configured with RetroArch by default).
- Open RetroArch meny pressing
Select + X. - Select
Close Contentmenu. - Follow the path:
Main Menu > Settings > On-Screen Display > On-Screen Notifications > Notification Visibility. - Enable
Display Framerate. - Go back to the Main Menu by pressing
Brepeatedly. - Open
Configuration Filemenu. - Invoke
Save Current Configurationcommand. - Go back to the Main Menu by pressing
Bonce. - Invoke
Quit RetroArchcommand.
To deactivate it, we will proceed in the same way but deactivating the option in step 5.
In xMAME the FPS option is activated/deactivated at any time by pressing Start + R1.
Join this Telegram channel to get update notifications: https://t.me/adam_image