Full-stack starter kit with authentication, database, and modern UI
Features • Tech Stack • Getting Started • Structure • Deployment
Nexus is a production-ready, full-stack monorepo starter kit that provides everything you need to build modern web applications. It combines the power of Next.js, Supabase authentication, Prisma ORM, and a beautiful UI powered by Tailwind CSS v4 and shadcn/ui.
- 🔐 Complete Authentication System - Email/password auth with Supabase
- 🎨 Modern UI Components - Pre-configured shadcn/ui with Tailwind CSS v4
- 📦 Monorepo Architecture - Organized with Turborepo for scalability
- 🗄️ Type-safe Database - Prisma ORM with PostgreSQL (Supabase)
- 🌙 Dark Mode - Built-in theme switching
- 🛡️ Security First - Row Level Security (RLS) policies configured
- 🚀 Production Ready - TypeScript, Biome (linting & formatting) pre-configured
- ✅ Email/password authentication
- ✅ Forgot password flow
- ✅ Email confirmation
- ✅ Protected routes with middleware
- ✅ Session management
- ✅ Supabase Row Level Security (RLS)
- ✅ TypeScript throughout
- ✅ Hot Module Replacement
- ✅ Shared component library
- ✅ Consistent code style (Biome)
- ✅ Git hooks with Husky
- ✅ Turborepo for fast builds
- ✅ Responsive design
- ✅ Dark/light mode
- ✅ Loading states
- ✅ Error boundaries
- ✅ Modern landing page
- ✅ Form validation with Zod
| Category | Technology |
|---|---|
| Framework | Next.js (App Router) |
| Language | TypeScript |
| Styling | Tailwind CSS v4 |
| UI Library | shadcn/ui |
| Database | PostgreSQL via Supabase |
| ORM | Prisma |
| Authentication | Supabase Auth |
| Package Manager | pnpm |
| Monorepo Tool | Turborepo |
| Deployment | Vercel |
- Node.js >= 22.16.0
- pnpm >= 10.12.2 (install guide)
- Supabase account (sign up)
- Git
# Clone the repository
git clone https://github.com/youming-ai/nexus.git
cd nexus

# Install dependencies
pnpm install-
Create a new Supabase project at supabase.com
-
Run the SQL scripts in your Supabase SQL editor in this order:
-- 1. First, run all files in packages/db/supabase/functions/
-- 2. Then, run all files in packages/db/supabase/rls/
-- 3. Finally, run all files in packages/db/supabase/triggers/
-
Configure email templates:
- Go to Auth templates in your dashboard
- In the Confirm signup template, change:
to:
{{ .ConfirmationURL }}{{ .SiteURL }}/api/auth/confirm?token_hash={{ .TokenHash }}&type=email
Create .env.local in the apps/web directory:
cd apps/web
cp .env.example .env.local
Add your environment variables:
# Supabase
NEXT_PUBLIC_SUPABASE_URL=your_supabase_project_url
NEXT_PUBLIC_SUPABASE_ANON_KEY=your_supabase_anon_key

# Database (for Prisma)
DATABASE_URL=your_supabase_database_url
DIRECT_URL=your_supabase_direct_url
💡 Find these values in your Supabase project settings under Settings > API and Settings > Database
# Generate Prisma client
pnpm --filter @workspace/db db:generate

# Run migrations (if any)
pnpm --filter @workspace/db db:push# Start all apps and packages
pnpm dev
# Or start specific workspace
pnpm --filter web devYour app will be available at:
- 🌐 Web app: http://localhost:3000
nexus/
├── apps/
│   └── web/                    # Next.js web application
│       ├── app/                # App router pages and API routes
│       ├── components/         # App-specific components
│       ├── config/            # App configuration
│       ├── lib/               # Utilities and libraries
│       ├── modules/           # Feature modules
│       ├── public/            # Static assets
│       └── utils/             # Helper functions
├── packages/
│   ├── db/                    # Database package
│   │   ├── prisma/            # Prisma schema and migrations
│   │   └── supabase/          # Supabase SQL scripts
│   ├── ui/                    # Shared UI component library
│   │   └── src/components/    # Reusable components
│   └── typescript-config/     # Shared TypeScript configuration
├── turbo.json                 # Turborepo configuration
└── pnpm-workspace.yaml        # pnpm workspace configuration
apps/web- Main Next.js application with authentication flowspackages/db- Database schema, migrations, and RLS policiespackages/ui- Shared component library using shadcn/uiapps/web/modules- Feature-based modules (landing, users)apps/web/lib/dal- Data Access Layer for database operations
# Development
pnpm dev          # Start all packages in development mode
pnpm build        # Build all packages
pnpm lint         # Lint all packages
pnpm format       # Format code with Biome

# Database
pnpm --filter @workspace/db db:generate  # Generate Prisma client
pnpm --filter @workspace/db db:push      # Push schema changes
pnpm --filter @workspace/db db:studio    # Open Prisma Studio

# Add UI components
pnpm --filter web dlx shadcn@latest add [component-name]cd apps/web
pnpm dev # Start development server with Turbopack
pnpm build # Create production build
pnpm start # Start production server
pnpm lint # Run Biome linter
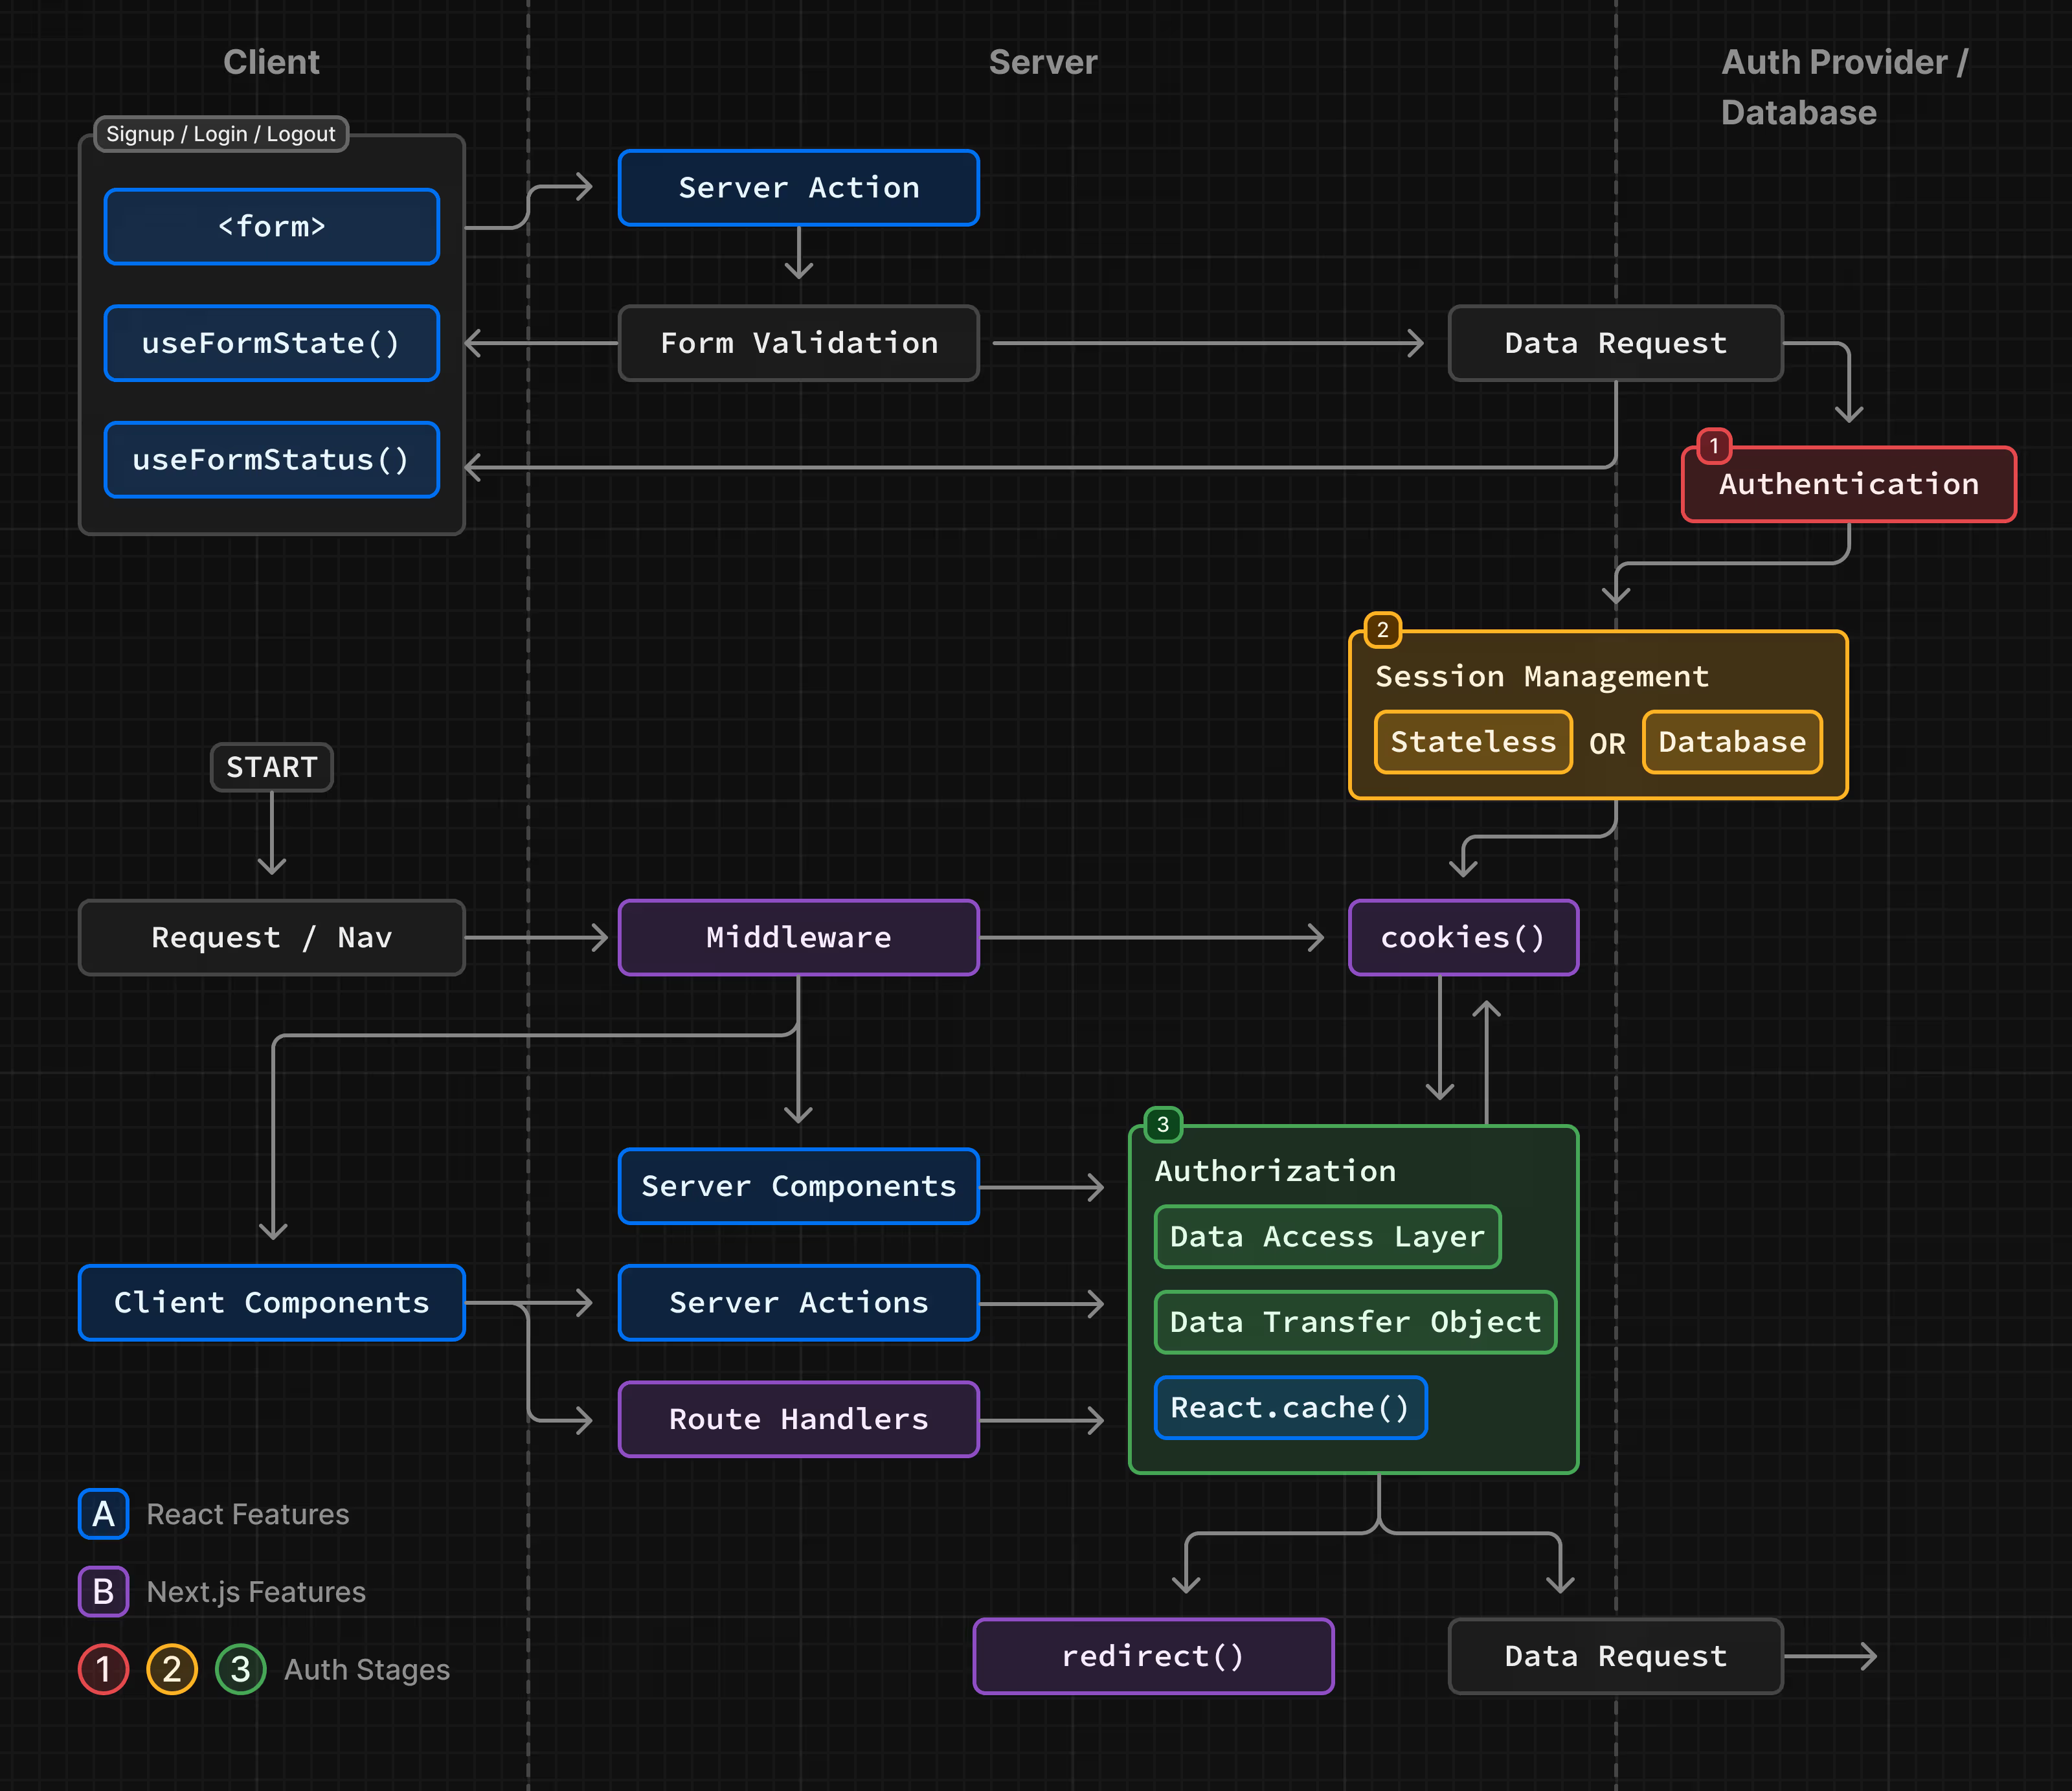
pnpm typecheck # Run TypeScript compiler checkNexus implements a complete authentication system:
- Sign Up → Email confirmation → Redirect to login
- Sign In → Session created → Redirect to dashboard
- Protected Routes → Middleware checks → Access granted/denied
- Password Reset → Email sent → Reset form → Success
The authentication is handled by Supabase Auth with custom middleware for session management.
-
Push your code to GitHub
-
Import your repository on Vercel
-
Configure environment variables:
NEXT_PUBLIC_SUPABASE_URL NEXT_PUBLIC_SUPABASE_ANON_KEY DATABASE_URL DIRECT_URL -
Deploy! 🎉
The project can be deployed to any platform that supports Node.js:
# Build the application
pnpm build

# Start production server
pnpm startWe welcome contributions! Please see our contributing guidelines before submitting PRs.
- Fork the repository
- Create your feature branch (
git checkout -b feature/amazing-feature) - Commit your changes (
git commit -m 'Add some amazing feature') - Push to the branch (
git push origin feature/amazing-feature) - Open a Pull Request
This project is licensed under the MIT License - see the LICENSE file for details.
- Next.js team for the amazing framework
- Supabase for the authentication and database
- shadcn for the beautiful UI components
- Vercel for hosting and deployment
Built with ❤️ by youming-ai