This is a ClojureScript project template for AWS Amplify.
By way of an example it sets up the basic functionality to start writing a multi-user realtime game.
- AWS Amplify integration
- Material UI for styling
- Testing with Karma
This project requires Node.js and npm. The required versions are:
- Node.js: >=16.0.0
- npm: >=8.0.0
This is a brief set of instructions to set up a new project, it assumes that you are familiar with this entire document and the structure of the template.
- Visit the AWS Amplify CLJS Template on GitHub.
- Click on "Use this template".
- Fill in 'myproject' as the name for your new repository.
- Click on "Create repository".
- Navigate to your GitHub account settings.
- Go to Integrations > Applications > AWS Amplify > configure.
- Add your 'myproject' repository to the AWS Amplify application and save your changes.
- Navigate to your 'myproject' directory in your terminal and execute
grep -r cljstemplate .. - Rename the
api/cljstemplatefolder toapi/myproject. - Rename the
auth/cljstemplatecc274de4folder toapi/myprojectc274de4. - Empty the content of the
team-provider-info.jsonfile. - Use a text editor or IDE to find and replace
cljstemplatewithmyprojectacross your project, especially check the /amplify.config files. For example, inproject-config.jsonchange"projectName": "cljstemplate"to"projectName": "myproject". - Run
amplify initin your terminal. - When asked for the environment name, use something like
devmyprojecta. This allows you to have multiple environments for the same project in the future, likedevmyprojectb,devmyprojectc, etc. - Run
amplify pushand agree to the questions asked. - Run
yarnto install project dependencies. - In separate terminals, run
yarn watch,yarn webpack, andyarn karma. Ensure all karma tests pass. - Navigate to the Amplify Console in your AWS account, go to your app, click on Hosting environments, select GitHub, authorize Amplify to access your 'myproject' repository in GitHub, and connect the main branch.
- Change the package name in
package.jsonfromaws-amplify-cljs-templatetomyproject. - Run
yarn installto install project dependencies. - Run
amplify init. - Set up the environment using a name like
devmyprojecta. - Select your default editor (e.g., Visual Studio Code) and the authentication method (e.g., AWS profile).
- Choose the AWS profile you wish to use.
- Add the backend environment to your AWS Amplify app.
- Run
amplify pushand answer 'Y' to all questions. - Run
amplify add hosting. - Choose the 'Hosting with Amplify Console' option and select 'Continues deployment'.
- Connect your repository branch and choose the existing environment (e.g.,
devmyproject). - Enable 'full-stack continuous deployments (CI/CD)' and use the existing service role
amplifyconsole-backend-role. - Choose the advanced build image (e.g.,
public.ecr.aws/n1r2w5d4/tre-amplify-custom-image).
- Create test user accounts
testUser1andtestUser2with passwords fromcypress-configin the secrets manager. - Run
yarn cypress:runin your terminal.
- Add
CYPRESS_CONFIGandBASE_PATHenvironment variables in your project or server configuration.
- Configure any necessary URL rewrites and redirects for your application, as per your project requirements.
-
Install Amplify CLI: If you haven't used Amplify before, or don't have a profile set up on the AWS account you plan to use, follow the Amplify CLI Installation Guide.
-
Setup Amplify: Follow the guide on Amplify CLI Workflows to set up Amplify for your project.
To run the project, you need to start webpack, the development server, and the Karma test runner in separate terminals.
-
Start the dev server:
yarn watch -
Start webpack: In a second terminal
yarn webpack -
Start the Karma test runner: In a third terminal yarn karma
Some of the Cypress tests check that an email is received, for this to work you need to create some test email accounts and set things up so they can be accessed by the GMail api.
Create 2 test user email accounts following the instructions for gmail-tester: https://github.com/levz0r/gmail-tester (they seem a bit out of date though), the following is what I did:
- Copy
cypress-config-example.jsonand rename it tocypress-config.jsonupdate the details in this file as you work though this process - Create a new gmail account
- Log into the account and go to https://console.cloud.google.com/projectselector2/apis/credentials?supportedpurview=project
- Create a Project (you don't really need to create an organisation)
- Click
CONFIGURE CONSENT SCREEN, select User TypeExternal, create an app, the details don't matter. - When you get to the Test users screen, click
ADD USERSenter the test email address you are setting up and clickSAVE - Click
SAVE AND CONTINUE - Click
Credentialsin the menu and thenCREATE CREDENTIALS - Select
OAuth client ID - Select Application type:
Desktop app, add a name if you want - Click
CREATE - Click
DOWNLOAD JSON, put the file in the root of the project for now and rename itcredentials.json - Click
Enabled APIs and servicesthenENABLE APIS AND SERVICES, search for and selectGmail APIand clickENABLE - In a terminal at the root of the project run
yarn install

node node_modules/gmail-tester/init.js credentials.json token.json TEST_EMAIL_ADDRESS
- A browser window will open, select the account you with to use.
- You will see a message like
Google hasn't verified this app, just clickContinue, clickContinueagain when asked about access. - A token.json file will now appear in the root of the project.
- Update
cypress-config.jsonwith the details with the credentials and tokens you just created.
Now we want to store this information in AWS Secrets Manager
- Got to
https://eu-west-1.console.aws.amazon.com/secretsmanager/listsecrets - Click
Store a new secret - Select
other type of secret - Click plain test and copy the contents of your
cypress-config.jsonfile there - Use the
aws/secretsmanagerencryption key - Click
Next - The Secret name is
cypress/config - Click
NextthenNextagain - Click
Store - Check your secret is there and the value is correct
In cypress-config.json set userPoolId to the aws_user_pools_id value in the aws-exports.js file.
In the Amplify Console on AWS create an environment variable called CYPRESS_CONFIG and copy the contents of cypress-config.json into that, for all branches. see: https://docs.aws.amazon.com/amplify/latest/userguide/environment-variables.html
Delete the files you created while performing this task, i.e credentials.json, token.json and cypress-config.json
Create accounts in the app for your test users, with user names testUser1 and testUser2 with the passwords from the file.
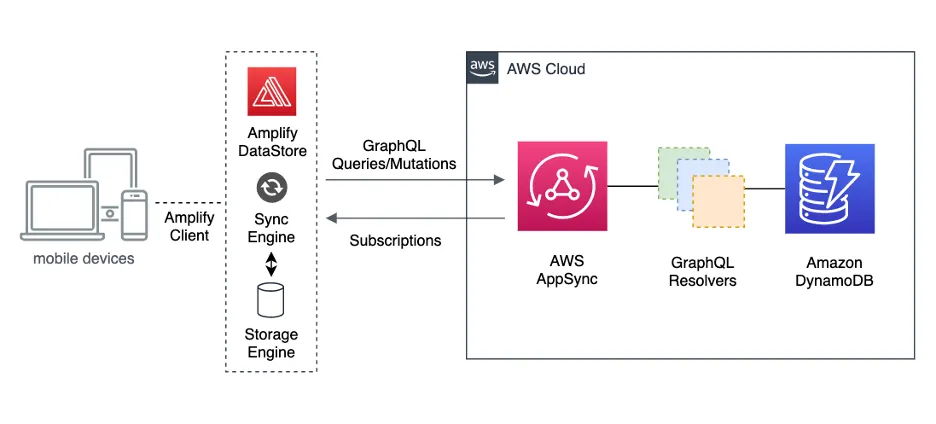
The project uses AWS Amplify DataStore for managing application data.
This project primarily relies on several JavaScript technologies and libraries. The key dependencies are:
-
AWS Amplify: A set of tools and services that enables developers to build scalable and secure cloud applications. The project uses
@aws-amplify/authfor authentication,@aws-amplify/datastorefor data storage and synchronization, and@aws-amplify/ui-reactfor user interface components. -
React: A JavaScript library for building user interfaces. The project also uses
react-domfor DOM-specific methods andreact-test-rendererfor testing. -
Material-UI: A popular React UI framework. The project uses
@material-ui/coreand@mui/materialfor core components,@material-ui/iconsand@mui/icons-materialfor icons,@mui/labfor advanced UI components,@mui/stylesfor styling, and@mui/systemfor utility functions. -
React JSON Schema Form (rjsf): A React component for building Web forms from JSON Schema. The project uses
@rjsf/core,@rjsf/mui,@rjsf/utils, and@rjsf/validator-ajv6. -
Howler.js: An audio library for the modern web.
-
React Testing Library: A lightweight solution for testing React components.
-
Webpack: A module bundler for modern JavaScript applications.
The project also uses several ClojureScript libraries:
-
Shadow-cljs: A ClojureScript compiler which seamlessly integrates with JavaScript development tools.
-
Reitit: A fast data-driven router for Clojure(Script).
-
Malli: A data-driven schema library for Clojure/Script.
-
Promesa: A promise library for Clojure(Script).
-
UIx: An idiomatic ClojureScript interface to modern React.js.
-
refx: A ClojureScript library for maintaining and manipulating local state in a functional and declarative manner.
Please consult the respective documentation of each dependency to understand its usage and functionality in the project.
The provided Dockerfile is used to construct the build image utilized by the Amplify Console.
public.ecr.aws/n1r2w5d4/tre-amplify-custom-image is available publicly, so you can just use that if you like.
To build and deploy your own, create a public repository in ECR, then run the following commands replacing
n1r2w5d4/tre-amplify-custom-image with your own registry alias and repository name.
- Authenticate your Docker client with your registry:
aws ecr-public get-login-password --region us-east-1 | docker login --username AWS --password-stdin public.ecr.aws/n1r2w5d4- Build, tag, and push the container to the ECR repository:
docker buildx build --platform linux/amd64 --push -t public.ecr.aws/n1r2w5d4/tre-amplify-custom-image .By following these instructions, you can update the Docker image in your ECR repository.
You need to set a BASE_PATH env var for each subdomain
You also need to set up the following redirects.

</^(/game)[^.]+$|\.(?!(html|htm|mp3|bin|gltf|css|gif|ico|jpg|js|png|txt|svg|woff|ttf|map|json)$)([^.]+$)/>

</^(/email-settings)[^.]+$|\.(?!(html|htm|mp3|bin|gltf|css|gif|ico|jpg|js|png|txt|svg|woff|ttf|map|json)$)([^.]+$)/>
If you have never used Amplify before on the AWS accoutn you wish to use and do not have profile set up, follow:
https://docs.amplify.aws/cli/start/install/
Otherwise you can start here:
https://docs.amplify.aws/cli/start/workflows/
❯ amplify init
Note: It is recommended to run this command from the root of your app directory
? Enter a name for the project cljstemplate
The following configuration will be applied:

Project information
| Name: cljstemplate
| Environment: dev
| Default editor: Visual Studio Code
| App type: javascript
| Javascript framework: react
| Source Directory Path: src
| Distribution Directory Path: build
| Build Command: npm run-script build
| Start Command: npm run-script start

? Initialize the project with the above configuration? No
? Enter a name for the environment devcljst
? Choose your default editor: Visual Studio Code
✔ Choose the type of app that you're building · javascript
Please tell us about your project
? What javascript framework are you using react
? Source Directory Path:  src/amplify
? Distribution Directory Path: public
? Build Command:  npm run-script build
? Start Command: npm run-script start
Using default provider  awscloudformation
? Select the authentication method you want to use: AWS profile
❯ amplify add api
? Select from one of the below mentioned services: GraphQL
? Here is the GraphQL API that we will create. Select a setting to edit or continue Authorization modes: API key (default, expira
tion time: 7 days from now)
? Choose the default authorization type for the API Amazon Cognito User Pool
Using service: Cognito, provided by: awscloudformation

 The current configured provider is Amazon Cognito.

 Do you want to use the default authentication and security configuration? Default configuration
 Warning: you will not be able to edit these selections.
 How do you want users to be able to sign in? Username
 Do you want to configure advanced settings? No, I am done.
✅ Successfully added auth resource cljstemplatecc274de4 locally

✅ Some next steps:
"amplify push" will build all your local backend resources and provision it in the cloud
"amplify publish" will build all your local backend and frontend resources (if you have hosting category added) and provision it in the cloud

? Configure additional auth types? Yes
? Choose the additional authorization types you want to configure for the API IAM
? Here is the GraphQL API that we will create. Select a setting to edit or continue Conflict detection (required for DataStore):
Disabled
? Enable conflict detection? Yes
? Select the default resolution strategy Auto Merge
? Here is the GraphQL API that we will create. Select a setting to edit or continue Continue
? Choose a schema template: Single object with fields (e.g., “Todo” with ID, name, description)

⚠️  WARNING: Some types do not have authorization rules configured. That means all create, read, update, and delete operations are denied on these types:
         - Todo
Learn more about "@auth" authorization rules here: https://docs.amplify.aws/cli/graphql/authorization-rules
✅ GraphQL schema compiled successfully.
This project is licensed under the MIT License.