In this step-by-step tutorial, you will learn how to deploy your Streamlit App in just a few minutes 🚀.
When I first started creating Streamlit apps, I had no idea how to link my GitHub repository to Streamlit or even where to begin. Hopefully, this tutorial will help someone out there who is in the same situation.
Additionally, I’ll be creating a series of videos about my Streamlit apps, and this video serves as the starting point if you want to follow along. This will be especially useful if you’d like to clone the repository and tweak the app locally.
This tutorial is divided in three parts:
I’ll show you how to create a GitHub repository and push your developed app to the newly created repository.
Once the app is hosted in your GitHub repository, deploying it on Streamlit is the easy part. I’ll guide you through the process step by step.
Now, we’ll reverse the process. Imagine you find a Streamlit app that interests you and want to clone it to experiment with it locally. I’ll show you how.
This app is built entirely using Streamlit, a Python framework that makes it easy to create and share interactive web applications.
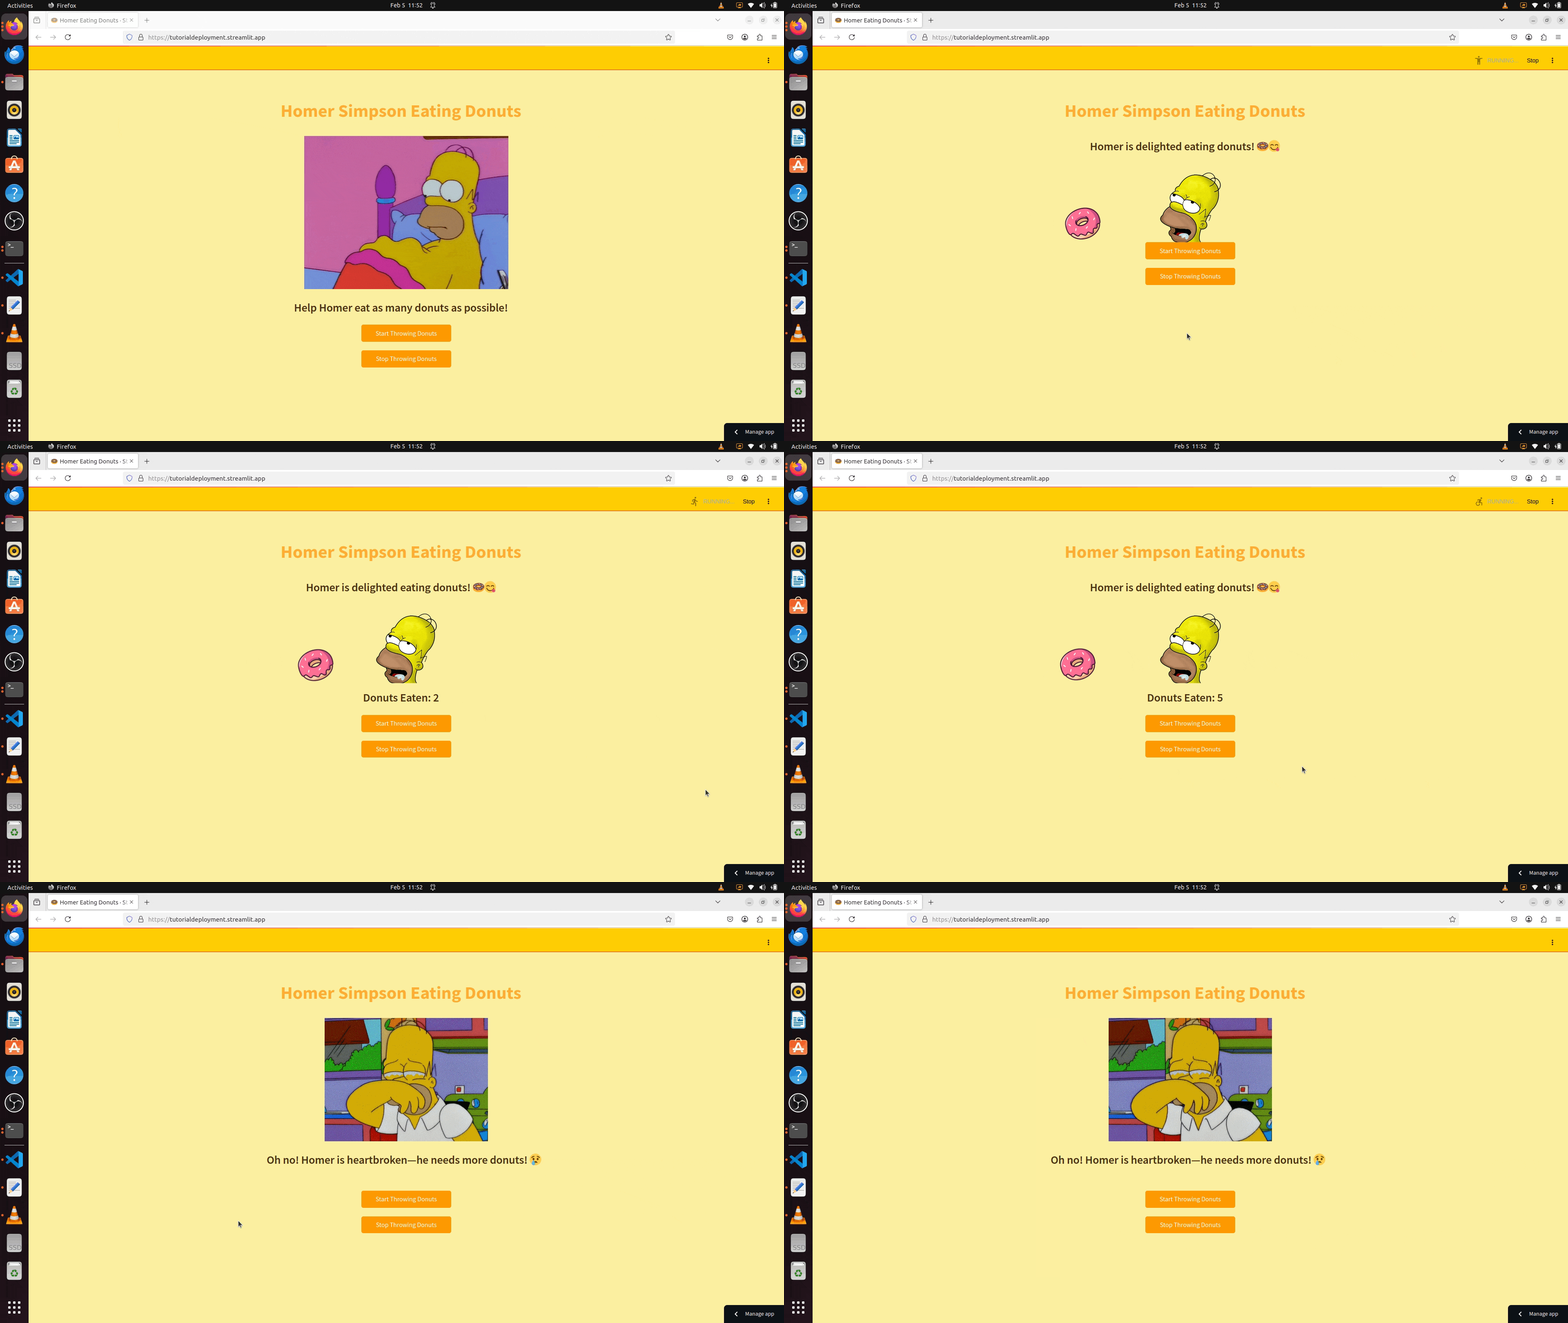
The app is a fun and interactive Homer Simpson Donut Tracker, where Homer eagerly eats donuts as they are thrown at him. It works as follows:
- Initial State – Homer appears hungry, waiting for donuts.
- Throwing Donuts – When you press the Start Throwing Donuts button, donuts begin moving across the screen toward Homer’s mouth. The app tracks how many donuts he eats.
- Stopping the Feast – When you press Stop Throwing Donuts, the animation stops, and Homer reacts with disappointment, displaying a sad GIF.
Streamlit allows us to create this engaging app with minimal code. We use:
- Buttons to start and stop the donut animation.
- Session State to track Homer’s donut count and update his expressions dynamically.
- GIFs and Images to animate Homer’s emotions.
- Custom Styling to give the app a fun, Simpsons-themed design.
With just one library—Streamlit, we’ve built an interactive app that is both simple and visually engaging! 👌
- Clone the repository:
git clone https://github.com/josericodata/StreamlitTutorialDeployment.git- Navigate to the repository directory:
cd StreamlitTutorialDeployment- Check current remote URL:
git remote -vIf it shows HTTPS (https://github.com/...), update it to SSH:
- Set the remote URL:
git remote set-url origin [email protected]:josericodata/StreamlitTutorialDeployment.gitNote: I'm using my user [email protected]:josericodata, when you are replicating you will be using your user name [email protected]:yourusername, keep that in mind.
- Check again current remote URL:
git remote -vYou should now see:
origin [email protected]:josericodata/StreamlitTutorialDeployment.git(fetch)
origin [email protected]:josericodata/StreamlitTutorialDeployment.git (push)
Note: Now it is showing my user [email protected]:josericodata, when you are replicating it you should see [email protected]:yourusername, keep that in mind.
- Ping the repository:
ssh -T [email protected]You should get this message: Hi josericodata! You've succesfully authenticated, but GitHub does not provide shell access.
Now it's the moment to add your developed app into StreamlitTutorialDeployment, copy and paste the files and commit the changes to GitHub.
- Add the files:
git add .- Commit changes:
git commit -m"Uploading Your Streamlit App."- Push changes into GitHub:
git push origin mainCheck now your GitHub repository you should see the a new commit there.
In the video, you can see that I'm creating a new directory. This is because I'm cloning the same app I developed, so I need to move to a different location to avoid any conflicts. If you're following this tutorial step by step, simply create a new directory and clone the app there.
- Clone the repository:
git clone https://github.com/user/StreamlitTutorialDeployment.gitHint: Replace user with josericodata in the URL above. I am deliberately asking you to pause here so you can support my work. If you appreciate it, please consider giving the repository a star or forking it. Your support means a lot—thank you! 😊
- Navigate to the repository directory:
cd StreamlitTutorialDeployment- Navigate to the repository directory:
python3 -m venv venvStrTutDep- Activate the virtual environment:
source venvStrTutDep/bin/activate- Install requirements:
pip install -r requirements.txt- Navigate to the app directory:
cd streamlit_app- Run the app:
streamlit run app.pyThe app will be live at http://localhost:8501
Click the image above or here to watch the video on YouTube.
The Streamlit Tutorial Deployment app is built and tested using the following software environment:
- Operating System: Ubuntu 22.04.5 LTS (Jammy)
- Python Version: Python 3.10.12
This tutorial is intended for educational purposes only. While I have done my best to ensure accuracy, I cannot guarantee that everything will work flawlessly in every environment.
Deploying a Streamlit app depends on external services like GitHub and Streamlit, which may change over time. If you encounter any issues, please refer to the official documentation of these platforms.
Use this tutorial as a guide, but always verify configurations and security settings, especially when deploying real-world applications. I am not responsible for any issues that arise from following this tutorial.
Happy coding! 🚀

