This is being written whilst installing on a new RPi 3, but it should be applicable for earlier models.
Before we start make sure you have the following items...
- A network to connect the RPi to (via Wi-Fi or wire)
- An HDMI monitor or TV
- A USB mouse
- A USB keyboard
- An 8GB or larger micro SD Card
- A Windows PC or Mac that can read micro SD Cards via a card reader or SD slot+adaptor
First you need to install teh Raspbian operating system on to the micro SD Card but before you do that format the card using the SD Card foundations Formatting tool, which you can download from here...
https://www.sdcard.org/downloads/formatter_4/
There is a version for Windows or Mac OSX and after downloading the tool of choice, extract and run the Setup program. Once installed, run the program with the micro SD plugged in to a card reader or SD card slot on the computer. It is good practice to give the card a volume name such as "Signal_K" which will remind you what is on the card at a later date as one LINUX distribution card looks much the same as another.

Once your SD Card is properly formatted, we need to copy a LINUX Operating System on to it. To make things easy the nice people at RaspberryPi.org have created a "NOOBs" distribution which can be downloaded from here....
https://www.raspberrypi.org/downloads/noobs/
Select the NOOBs option on the left hand side (not the NOOBs Lite) and click on the "Download Zip" button. It is quite a large file approximately 1GB, so make sure you have a fast internet connection i.e. don't leave it till you get down on the boat !
Once downloaded open the ZIP file and extract all files/folders to your blank and freshly formatted micro SD Card. Once the copy operation is complete, insert the micro SD Card in to the RPi with the unit powered down. With all of the cables and peripherals plugged in, power up your Raspberry Pi and follow the instructions that appear on the screen. With the latest "Jessie" release the amount of options you need to select are significantly reduced and the whole operation should only take 10-15mins.
After everything has been configured you should be presented with the RPi Desktop and your LINUX operating system is installed and running, just waiting for you to install Signal K.

The RPi installation of Signal K can be broken down in to three distinct steps;
- Install the tools and libraries required to run the Signal K server (the dependencies)
- Install a Signal K Server to process the Signal K data; we will install the Node-Server
- Install the Web Apps (consumers) that can read Signal K data
Raspbian the LINUX distribution for RPi is based on Debian which has a powerful installation tool called "apt-get", which we will use to install some of the dependencies and tools required. Before you use "apt-get" it is always recommended to update its index of repositories (websites that store LINUX software) and to do that use the following command...
$ sudo apt-get update
Now we will download three tools; curl, git and build-essential. These tools will allow us to download more software, clone the Signal K server and allow it to run, Install the three tools using the following command...
$ sudo apt-get install -y curl git build-essential dialog
Node server requires Node version 8 or newer. For Raspberry Pi 2 and 3 follow the instructions below. If in doubt, test with
$ uname -m
If the result returned starts with “armv6”, you are running a Raspberry Pi based on the older ARMv6 chipset and these instructions will not work.
Add NodeSource repository to the system so that we can install Node with apt-get:
$ curl -sL https://deb.nodesource.com/setup_8.x | sudo -E bash -
$ sudo apt install nodejs
Finally we need to install a Bonjour (mDNS) service for LINUX called Avahi, which allows Apps and other network devices to Discover the Signal K server. To do this we will use "apt-get" again ...
$ sudo apt-get install libnss-mdns avahi-utils libavahi-compat-libdnssd-dev
To check if Avahi is installed and working correctly enter the following command...
$ avahi-browse -a
This will search for and list all of the discoverable devices/services on your network. Use ctrl+c to stop the search.

In this "How To" guide we are going to use the Signal K Node Server, but we also have a guide for the Java Server which is the other popular Signal K server.
A Signal K Server is the central hub of a Signal K system; reading and converting the boat's NMEA data (or Signal K data from a gateway), which it then stores and logs, before outputting the Signal K data to web apps (consumers) on the boat or sending it off the boat to other vessels or Cloud services.
Install the Node Server using npm
$ sudo npm install -g --unsafe-perm signalk-server
Now you need to start the Node Server. Type...
$ signalk-server --sample-nmea0183-data
You should see the terminal output "signalk-server running at 0.0.0.0:3000" as shown below...
$ signalk-server --sample-nmea0183-data
Using default configuration path: /home/pi/.signalk
Settings file does not exist, using empty settings
Using sample data from /usr/lib/node_modules/signalk-server/samples/plaka.log
*** WARNING *** The program 'node' uses the Apple Bonjour compatibility layer of Avahi.
*** WARNING *** Please fix your application to use the native API of Avahi!
*** WARNING *** For more information see <http://0pointer.de/avahi-compat?s=libdns_sd&e=node>
*** WARNING *** The program 'node' called 'DNSServiceRegister()' which is not supported (or only supported partially) in the Apple Bonjour compatibility layer of Avahi.
*** WARNING *** Please fix your application to use the native API of Avahi!
*** WARNING *** For more information see <http://0pointer.de/avahi-compat?s=libdns_sd&e=node&f=DNSServiceRegister> signalk-server running at 0.0.0.0:3000
As the file name suggests, the Signal K Node Server is now reading NMEA Data from a Demo File and is ready to pass that data to any device that wants it. (The warnings is OK) To get your first taste of what Signal K data looks like, open the Web browser on your RPi and type this URL in to the address bar "http://127.0.0.1:3000/signalk". This directs the browser to the Signal K server on the RPi (127.0.0.1 is your local Loopback address) and you should see the following info on the screen...
{"endpoints":{"v1":{"version":"1.alpha1","signalk-http":"http://127.0.0.1:3000/signalk/v1/api/","signalk-ws":"ws://127.0.0.1:3000/signalk/v1/stream","signalk-tcp":"tcp://127.0.0.1:3858"}},"server":{"id":"signalk-server-node","version":"1.0.0-3"}}
So that is Signal K....looks good doesn't it ? Actually this is just some JSON data that tells an App what the URL "endpoints" are so that it knows what Version of Signal K the server supports and where it can get HTTP or Websocket data from.
If You want to see the the actual output from the NMEA data that SignalK is processing type "http://127.0.0.1:3000/signalk/v1/api/vessels/self/" in the adress bar and this info will be shown
{"name":"Plaka","mmsi":"123456789","navigation":{"speedThroughWater":{"meta":{"units":"m/s","description":"Vessel speed through the water"},"value":3.096956340117828,"$source":"NMEA0183 Plaka.log.II","timestamp":"2018-02-06T16:04:32.100Z","sentence":"VHW"},"courseOverGroundMagnetic":{"meta":{"units":"rad","description":"Course over ground (magnetic)"},"value":3.6030577086397786,"$source":"NMEA0183 Plaka.log.II","timestamp":"2018-02-06T16:04:32.100Z","sentence":"VTG"},"courseOverGroundTrue":{"meta":{"units":"rad","description":"Course over ground (true)"},"value":3.6030577086397786,"$source":"NMEA0183 Plaka.log.II","timestamp":"2018-02-06T16:04:32.100Z","sentence":"VTG"},"speedOverGround":{"meta":{"units":"m/s","description":"Vessel speed over ground. If converting from AIS 'HIGH' value, set to 102.2 (Ais max value) and add warning in notifications"},"value":2.9323340761912995,"$source":"NMEA0183 Plaka.log.II","timestamp":"2018-02-06T16:04:32.100Z","sentence":"VTG"},"position":{"meta":{"description":"The position of the vessel in 2 or 3 dimensions (WGS84 datum)"},"value":{"longitude":23.529716666666666,"latitude":60.076566666666665},"$source":"NMEA0183 Plaka.log.GP","timestamp":"2018-02-06T10:01:47.000Z","sentence":"GLL"}},"performance":{"velocityMadeGood":{"meta":{"units":"m/s","description":"The current velocity made good derived from the speed through water and appearant wind angle. A positive value is heading to upwind, negative to downwind."},"value":2.9220451846958913,"$source":"NMEA0183 Plaka.log.II","timestamp":"2018-02-06T16:04:32.100Z","sentence":"VPW"}},"environment":{"wind":{"speedApparent":{"meta":{"units":"m/s","description":"Apparent wind speed"},"value":7.7989797535193155,"$source":"NMEA0183 Plaka.log.II","timestamp":"2018-02-06T16:04:31.701Z","sentence":"MWV"},"angleApparent":{"meta":{"units":"rad","description":"Apparent wind angle, negative to port"},"value":-0.19198621776321237,"$source":"NMEA0183 Plaka.log.II","timestamp":"2018-02-06T16:04:31.701Z","sentence":"MWV"},"speedTrue":{"meta":{"units":"m/s","description":"Wind speed over water (as calculated from speedApparent and vessel's speed through water)"},"value":4.789478991112456,"$source":"NMEA0183 Plaka.log.II","timestamp":"2018-02-06T16:04:32.199Z","sentence":"MWV"},"angleTrueWater":{"meta":{"units":"rad","description":"True wind angle based on speed through water, negative to port"},"value":-0.349065850478568,"$source":"NMEA0183 Plaka.log.II","timestamp":"2018-02-06T16:04:32.199Z","sentence":"MWV"}},"depth":{"belowTransducer":{"meta":{"units":"m","description":"Depth below Transducer"},"value":13.29,"$source":"NMEA0183 Plaka.log.II","timestamp":"2018-02-06T16:04:32.300Z","sentence":"DBT"}},"current":{"meta":{"description":"Direction and strength of current affecting the vessel"},"value":{"setTrue":0,"setMagnetic":0,"drift":0},"$source":"NMEA0183 Plaka.log.II","timestamp":"2018-02-06T16:04:32.000Z","sentence":"VDR"}}}
A "Consumer" of Signal K data is any web app, mobile device app or software program that can read and use Signal K data. It is hoped that the number of consumers will grow rapidly as more developers discover this open format and dream up new applications to make boating easier, more efficient or just more fun.
For the purposes of this "How to" some open source web apps are automatically installed. They have been developed by the Signal K team to show what can be done with Signal K data. To use the web apps, we will need to open them in a web browser so open the browser on your Pi and type "http://127.0.0.1:3000/ This will open the Dashboard and give You some info about the SignalK server.

Click on Webapps and You will get
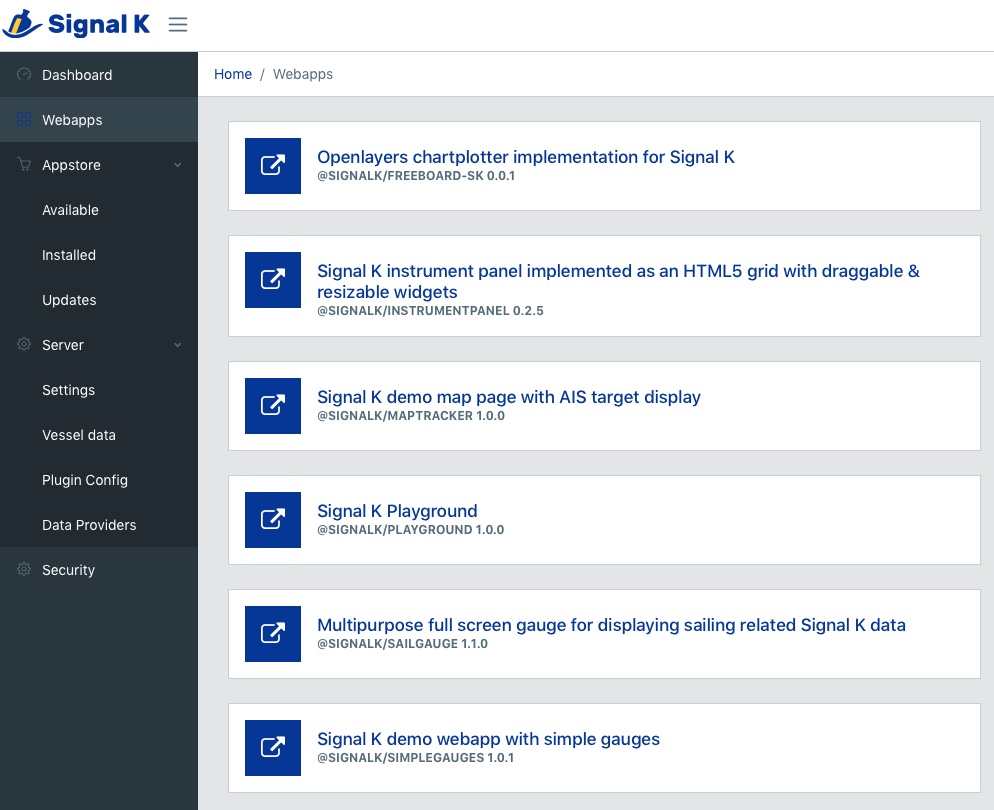
Click on "Openlayers chartplotter......." and You will get a Worldmap with Your position in the south of Finland
Go back and click "SignalK instrumentpanel......" and You will have an instrumentpanel to play around with.
If you have managed to get to the end of this guide, you will now have a good understanding of what Signal K is all about and in particular the Node Server. We have been using the server's demo NMEA file, but Node Server can also read NMEA0183 data via an NMEA to USB adaptor cable, a 3rd party NMEA2000 gateway or both NMEA0183 and NMEA2000 via the iKommunicate gateway.
To generate your own vessel settings file and configure your Pi to start the server automatically , type...
$ sudo signalk-server-setup
and follow the prompts. If You are following the defaults and are logged on as ”pi” the boat info will be stored in /home/pi/.signalk/defaults.json and the settings in /home/pi/.signalk/settings.json
You can re-run this command at any time in the future to change the settings.
These files can be edited via the admin UI or directly looking at the example settings.
This script will also set up Node server to run automatically in the background as a daemon, systemd, when the system boots. You will no longer be able to launch it manually, because the automatically started instance will occupy the ports where the services are available. You should do this once you are happy with the way the server works.
Stop the daemon temporarily with;
$ sudo systemctl stop signalk.service
$ sudo systemctl stop signalk.socket
Start the deamon with;
$ sudo systemctl start signalk.socket
$ sudo systemctl start signalk.service
Disable the automatic start with;
$ sudo systemctl disable signalk.service
$ sudo systemctl disable signalk.socket
Check status with;
$ sudo systemctl status signalk*
In addition the setup script will enable security by default. At the admin UI You have to use ”Login” in the upper right corner and create a account, for example user pi and password, and then logon. Security information is stored in /home/pi/.signalk/security.json

NMEA2000
If You have a NMEA2000 network You can use the the Actisense interface or other CAN bus interfaces to connect to the SignalK server. To configure it You have to know the the device path. One way to check it, is using the dmesg command direct after You plugged in the Actisense to a RPi USB port. In a Terminal window type
$ dmesg
or to minimize the output
$ dmesg | grep -i 'usb'
and it will show something like
(   2.141273) usb 1-1.3: new full-speed USB device number 4 using dwc_otg
(   2.317223) usb 1-1.3: New USB device found, idVendor=0403, idProduct=d9aa
(   2.319959) usb 1-1.3: New USB device strings: Mfr=1, Product=2, SerialNumber=3
(   2.322745) usb 1-1.3: Product: NGT-1-A
(   2.325417) usb 1-1.3: Manufacturer: Actisense
(   2.328022) usb 1-1.3: SerialNumber: XXXX
(   3.817103) usbcore: registered new interface driver usbserial
(   3.817189) usbcore: registered new interface driver usbserial_generic
(   3.820223) usbserial: USB Serial support registered for generic
(   3.822093) usbcore: registered new interface driver brcmfmac
(   3.832816) usbcore: registered new interface driver ftdi_sio
(   3.832909) usbserial: USB Serial support registered for FTDI USB Serial Device
(   3.833448) ftdi_sio 1-1.3:1.0: FTDI USB Serial Device converter detected
(   3.833649) usb 1-1.3: Detected FT232RL
(   3.837121) usb 1-1.3: FTDI USB Serial Device converter now attached to ttyUSB0
as seen on the last row the interface is attached to ttyUSB0 so the device path will be /dev/ttyUSB0
To set it up as input for the SignalK server go to the admin UI and ”Server => Data Providers”. Add a provider with settings according to the picture and click on ”Apply”

The SignalK server must be restarted to accept the changes so click on "Restart" in the upper right corner.
After the restart check the data with the Webapp Instrumentpanel in the admin UI.
NMEA0183
If You have a NMEA0183 network, plug in Your NMEA0183 to USB interface and do the same procedure as for the Actisense above. With a configuration maybe looking like this

If You don’t have any NMEA interface hardware You could set up a provider with the sample files instead.
Path to NMEA2000 file samples/aava-n2k.data
Path to NMEA0183 file samples/plaka.log
Many navigation or marine data applications just accept NMEA0183 data as input. SignalK have a plugin which can forward this data, to Your Tablet or Phone, and being processed in an application like iNavX, iSailor, SeaPilot and so on. Attach the SignalK server to a network with WiFi access, or set up the RPi as an access point(link below), and configure the signalk-to-nmea0183 plugin.
In the admin UI ”Appstore => Installed” You will find the plugin

(In this case there is an update, so just click on the "download cloud" and the update will take place. Restart SignalK.)
To activate and configure the plugin go to ”Server => Plugin Config”. Select "Convert SignalK......”. Then select "Active” and the sentences You need for Your application, click ”Submit” and restart SignalK. In Your tablet application, set it up to receive the NMEA0183 data from the SignalK server with the IP adress, protocol TCP, and port 10110. The picture is from iSailor

Here You have applications that will accept the json data direct from SignalK.
Temperature measure using 1-wire sensor, Node Red and plugins
Much as we would all like to be sailing 365 days a year, the reality is that we are down on our boats as and when we can and weeks and months can go by between using your Raspberry Pi and Signal K Node Server. Of course when you get back to the boat everything will continue to operate as it did when you left it, but Signal K (and the Raspberry Pi) are constantly evolving and if you wish to update to the latest builds, then you need to follow this process.
Please bear in mind that the longer between updates the more data that will have to be downloaded and the longer the process will take. We would seriously recommend taking your Raspberry Pi home and updating it on a network with good broadband speed.
The updates that need to be done can be broken down in to four key areas...
- The Raspberry Pi LINUX Distro
- Node and NPM
- The Signal K Node Server
- Any Signal K Apps
Open the terminal window and enter the following commands...
$ sudo apt-get update
$ sudo apt-get dist-upgrade
If you have not updated for a while, then the above commands may take a while to finish, just be patient and make sure everything completes correctly. After the two commands have completed Reboot your Raspberry Pi.
Open the terminal window and enter the following commands...
$ curl -sL https://deb.nodesource.com/setup_8.x | sudo -E bash -
$ sudo apt-get install nodejs
This will update Nodejs and NPM to the version required by the server.
Open the terminal window and enter the following commands...
$ sudo npm install --unsafe-perm -g signalk-server
As You noticed the apps are updated wia the Admin UI.
Now your Signal K Node Server is updated.