Repository navigation
Expand file tree
/
Copy pathsolution.py
More file actions
3359 lines (2962 loc) · 125 KB
/
Copy pathsolution.py
File metadata and controls
3359 lines (2962 loc) · 125 KB
1
2
3
4
5
6
7
8
9
10
11
12
13
14
15
16
17
18
19
20
21
22
23
24
25
26
27
28
29
30
31
32
33
34
35
36
37
38
39
40
41
42
43
44
45
46
47
48
49
50
51
52
53
54
55
56
57
58
59
60
61
62
63
64
65
66
67
68
69
70
71
72
73
74
75
76
77
78
79
80
81
82
83
84
85
86
87
88
89
90
91
92
93
94
95
96
97
98
99
100
101
102
103
104
105
106
107
108
109
110
111
112
113
114
115
116
117
118
119
120
121
122
123
124
125
126
127
128
129
130
131
132
133
134
135
136
137
138
139
140
141
142
143
144
145
146
147
148
149
150
151
152
153
154
155
156
157
158
159
160
161
162
163
164
165
166
167
168
169
170
171
172
173
174
175
176
177
178
179
180
181
182
183
184
185
186
187
188
189
190
191
192
193
194
195
196
197
198
199
200
201
202
203
204
205
206
207
208
209
210
211
212
213
214
215
216
217
218
219
220
221
222
223
224
225
226
227
228
229
230
231
232
233
234
235
236
237
238
239
240
241
242
243
244
245
246
247
248
249
250
251
252
253
254
255
256
257
258
259
260
261
262
263
264
265
266
267
268
269
270
271
272
273
274
275
276
277
278
279
280
281
282
283
284
285
286
287
288
289
290
291
292
293
294
295
296
297
298
299
300
301
302
303
304
305
306
307
308
309
310
311
312
313
314
315
316
317
318
319
320
321
322
323
324
325
326
327
328
329
330
331
332
333
334
335
336
337
338
339
340
341
342
343
344
345
346
347
348
349
350
351
352
353
354
355
356
357
358
359
360
361
362
363
364
365
366
367
368
369
370
371
372
373
374
375
376
377
378
379
380
381
382
383
384
385
386
387
388
389
390
391
392
393
394
395
396
397
398
399
400
401
402
403
404
405
406
407
408
409
410
411
412
413
414
415
416
417
418
419
420
421
422
423
424
425
426
427
428
429
430
431
432
433
434
435
436
437
438
439
440
441
442
443
444
445
446
447
448
449
450
451
452
453
454
455
456
457
458
459
460
461
462
463
464
465
466
467
468
469
470
471
472
473
474
475
476
477
478
479
480
481
482
483
484
485
486
487
488
489
490
491
492
493
494
495
496
497
498
499
500
501
502
503
504
505
506
507
508
509
510
511
512
513
514
515
516
517
518
519
520
521
522
523
524
525
526
527
528
529
530
531
532
533
534
535
536
537
538
539
540
541
542
543
544
545
546
547
548
549
550
551
552
553
554
555
556
557
558
559
560
561
562
563
564
565
566
567
568
569
570
571
572
573
574
575
576
577
578
579
580
581
582
583
584
585
586
587
588
589
590
591
592
593
594
595
596
597
598
599
600
601
602
603
604
605
606
607
608
609
610
611
612
613
614
615
616
617
618
619
620
621
622
623
624
625
626
627
628
629
630
631
632
633
634
635
636
637
638
639
640
641
642
643
644
645
646
647
648
649
650
651
652
653
654
655
656
657
658
659
660
661
662
663
664
665
666
667
668
669
670
671
672
673
674
675
676
677
678
679
680
681
682
683
684
685
686
687
688
689
690
691
692
693
694
695
696
697
698
699
700
701
702
703
704
705
706
707
708
709
710
711
712
713
714
715
716
717
718
719
720
721
722
723
724
725
726
727
728
729
730
731
732
733
734
735
736
737
738
739
740
741
742
743
744
745
746
747
748
749
750
751
752
753
754
755
756
757
758
759
760
761
762
763
764
765
766
767
768
769
770
771
772
773
774
775
776
777
778
779
780
781
782
783
784
785
786
787
788
789
790
791
792
793
794
795
796
797
798
799
800
801
802
803
804
805
806
807
808
809
810
811
812
813
814
815
816
817
818
819
820
821
822
823
824
825
826
827
828
829
830
831
832
833
834
835
836
837
838
839
840
841
842
843
844
845
846
847
848
849
850
851
852
853
854
855
856
857
858
859
860
861
862
863
864
865
866
867
868
869
870
871
872
873
874
875
876
877
878
879
880
881
882
883
884
885
886
887
888
889
890
891
892
893
894
895
896
897
898
899
900
901
902
903
904
905
906
907
908
909
910
911
912
913
914
915
916
917
918
919
920
921
922
923
924
925
926
927
928
929
930
931
932
933
934
935
936
937
938
939
940
941
942
943
944
945
946
947
948
949
950
951
952
953
954
955
956
957
958
959
960
961
962
963
964
965
966
967
968
969
970
971
972
973
974
975
976
977
978
979
980
981
982
983
984
985
986
987
988
989
990
991
992
993
994
995
996
997
998
999
1000
# %% [markdown] tags=[]
# # Image translation (Virtual Staining)
# Written by Eduardo Hirata-Miyasaki, Ziwen Liu, and Shalin Mehta, Biohub San Francisco
# ## Overview
#
# In this exercise, we will _virtually stain_ the nuclei and plasma membrane from the quantitative phase image (QPI), i.e., translate QPI images into fluorescence images of nuclei and plasma membranes.
# QPI encodes multiple cellular structures and virtual staining decomposes these structures. After the model is trained, one only needs to acquire label-free QPI data.
# This strategy solves the same problem as "multi-spectral imaging", but is more compatible with live cell imaging and high-throughput screening.
# Virtual staining is often a step towards multiple downstream analyses: segmentation, tracking, and cell state phenotyping.
#
# In this exercise, you will:
# - Train a model to predict the fluorescence images of nuclei and plasma membranes from QPI images
# - Make it robust to variations in imaging conditions using data augmentations
# - Segment the cells using Cellpose
# - Use regression and segmentation metrics to evaluate the models
# - Visualize the image transform learned by the model
# - Understand the failure modes of the trained model
#
# [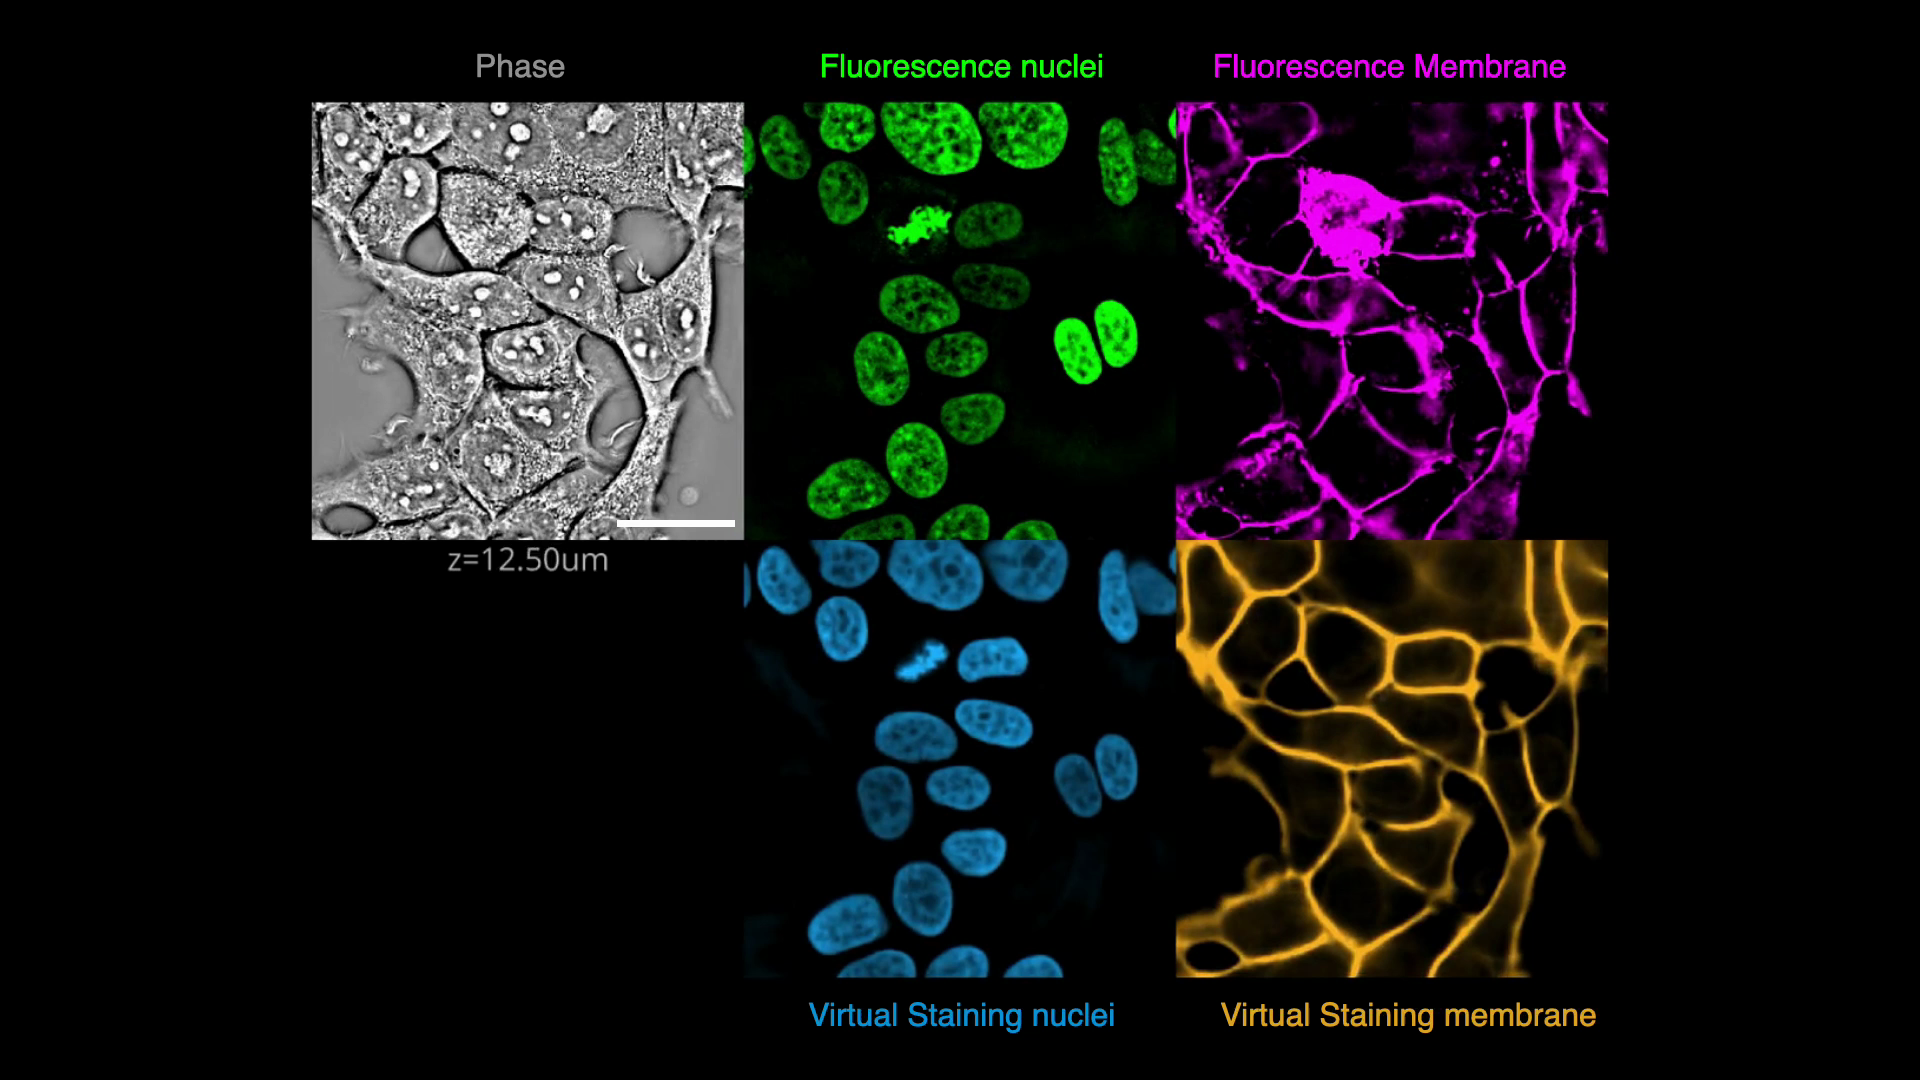](https://github-production-user-asset-6210df.s3.amazonaws.com/67518483/343891935-d53a81eb-eb37-44f3-b522-8bd7bddc7755.mp4?X-Amz-Algorithm=AWS4-HMAC-SHA256&X-Amz-Credential=AKIAVCODYLSA53PQK4ZA%2F20260604%2Fus-east-1%2Fs3%2Faws4_request&X-Amz-Date=20260604T191111Z&X-Amz-Expires=300&X-Amz-Signature=7cbe992928146b9284ed045c9a8e8fc5e18d59308dddbfcbb26362c653ebd0b2&X-Amz-SignedHeaders=host&response-content-type=video%2Fmp4)
# (Click on image to play video)
#
# %% [markdown] tags=[]
# ### Goals
# #### Part 1: Train a virtual staining model
#
# - Explore OME-Zarr using [iohub](https://czbiohub-sf.github.io/iohub/main/index.html)
# and the high-content-screen (HCS) format.
# - Use our `viscy.data.HCSDataloader()` dataloader and explore the 3 channel (phase, fluorescence nuclei and cell membrane)
# A549 cell dataset.
# - Implement data augmentations [MONAI](https://monai.io/) to train a robust model to imaging parameters and conditions.
# - Use tensorboard to log the augmentations, training and validation losses and batches
# - Start the training of the UNeXt2 model to predict nuclei and membrane from phase images.
#
# #### Part 2: Evaluate the model to translate phase into fluorescence.
# - Compare the performance of your trained model with the _VSCyto2D_ pre-trained model.
# - Evaluate the model using pixel-level and instance-level metrics.
#
# #### Part 3: Visualize the image transforms learned by the model and explore the model's regime of validity
# - Visualize the first 3 principal components mapped to a color space in each encoder and decoder block.
# - Explore the model's regime of validity by applying blurring and scaling transforms to the input phase image.
#
# #### For more information:
# Checkout [VisCy](https://github.com/mehta-lab/VisCy),
# our deep learning pipeline for training and deploying computer vision models
# for image-based phenotyping including the robust virtual staining of landmark organelles.
#
# VisCy exploits recent advances in data and metadata formats
# ([OME-zarr](https://link.springer.com/article/10.1007/s00418-023-02209-1)) and DL frameworks,
# [PyTorch Lightning](https://lightning.ai/) and [MONAI](https://monai.io/).
# ### References
# - [Liu, Z. and Hirata-Miyasaki, E. et al. (2025) Robust virtual staining of landmark organelles with Cytoland](https://www.nature.com/articles/s42256-025-01046-2)
# - [Guo et al. (2020) Revealing architectural order with quantitative label-free imaging and deep learning. eLife](https://elifesciences.org/articles/55502)
# %% [markdown] tags=[]
# <div class="alert alert-success">
# The exercise is organized in 3 parts:
# <ul>
# <li><b>Part 1</b> - Train a virtual staining model using iohub (I/O library), VisCy dataloaders, and tensorboard</li>
# <li><b>Part 2</b> - Evaluate the model to translate phase into fluorescence.</li>
# <li><b>Part 3</b> - Visualize the image transforms learned by the model and explore the model's regime of validity.</li>
# </ul>
# </div>
# %% [markdown] tags=[]
# <div class="alert alert-danger">
# Set your python kernel to <span style="color:black;">04_image_translation</span>
# </div>
# %% [markdown] tags=[]
# ## PyTorch Lightning Intro
#
# If you've used plain PyTorch you already know the pattern: write a model, write a
# `for batch in dataloader` loop, move tensors to `cuda`, call `loss.backward()`, step
# the optimizer, remember to `zero_grad()`, log every N steps, save a checkpoint, and
# repeat for validation. That boilerplate is the same in every project — so
# [PyTorch Lightning](https://lightning.ai) factors it out into **three objects** and
# owns the training loop for you.
#
# | Lightning object | What it holds | In this exercise |
# | --- | --- | --- |
# | `LightningDataModule` | How to load, split, augment, and batch your data (`train/val/test/predict_dataloader`) | `HCSDataModule` — reads OME-Zarr and yields `{"source": ..., "target": ...}` dicts |
# | `LightningModule` | The network, the loss, and what happens in `training_step` / `validation_step` (one batch at a time) | `VSUNet` — wraps the UNeXt2 architecture and the virtual-staining loss |
# | `Trainer` | The loop: device placement, mixed precision, logging, checkpointing, multi-GPU | `VisCyTrainer` — a thin subclass with VisCy-friendly defaults |
#
# You don't write a `for` loop. You call **`trainer.fit(model, datamodule)`** and
# Lightning drives everything. The trainer handles:
#
# - moving batches to the right device (`accelerator="gpu"`, `devices=[0]`)
# - mixed-precision training (`precision="16-mixed"`) so you use less GPU memory
# - when to log metrics / images (`log_every_n_steps`) and where (`logger=TensorBoardLogger(...)`)
# - saving checkpoints automatically under the logger's directory
# - running a sanity check on a single batch before real training (`fast_dev_run=True`)
#
# VisCy builds on top of Lightning and provides the `HCSDataModule` and `VSUNet`
# classes so you don't have to subclass `LightningDataModule` / `LightningModule`
# yourself. You configure them via constructor arguments and let Lightning run.
# When you see `trainer.fit(...)` below, that single call replaces a ~50-line hand-
# written training loop.
# %% [markdown]
# # Part 1: Log training data to tensorboard, start training a model.
# ---------
# Learning goals:
# - Load the OME-zarr dataset and examine the channels (A549).
# - Configure and understand the data loader.
# - Log some patches to tensorboard.
# - Initialize a 2D UNeXt2 model for virtual staining of nuclei and membrane from phase.
# - Start training the model to predict nuclei and membrane from phase.
# %% Imports
import os
from glob import glob
from pathlib import Path
from typing import Tuple
import matplotlib.pyplot as plt
import numpy as np
import pandas as pd
import torch
import torchview
from cellpose import models
from cmap import Colormap
from iohub import open_ome_zarr
from iohub.reader import print_info
from lightning.pytorch import seed_everything
from lightning.pytorch.loggers import TensorBoardLogger
from skimage.metrics import structural_similarity
from natsort import natsorted
from numpy.typing import ArrayLike
# pytorch lightning wrapper for Tensorboard.
from skimage.color import label2rgb
from torch.utils.tensorboard import SummaryWriter # for logging to tensorboard
from torchmetrics.functional import accuracy, jaccard_index
from torchmetrics.functional.segmentation import dice_score
from tqdm import tqdm
# Trainer class and UNet from the cytoland package.
from cytoland.engine import VSUNet
# HCSDataModule makes it easy to load data during training.
from viscy_data.hcs import HCSDataModule
# training augmentations
from viscy_transforms import (
CenterSpatialCropd,
NormalizeSampled,
RandAdjustContrastd,
RandAffined,
RandGaussianNoised,
RandGaussianSmoothd,
RandScaleIntensityd,
RandWeightedCropd,
)
from viscy_utils.evaluation.metrics import mean_average_precision
from viscy_utils.losses import MixedLoss
from viscy_utils.trainer import VisCyTrainer
# %%
# seed random number generators for reproducibility.
seed_everything(42, workers=True)
# %% tags=["task"]
# Set the path to the data.
#
# `top_dir` is the folder that contains training/, test/, and
# pretrained_models/. On the course machines the data is staged at
# /mnt/efs/dl_jrc/data/04_image_translation, so you can leave this as is.
#
# #######################
# ##### TODO ########
# #######################
top_dir = Path("/mnt/efs/dl_jrc/data/04_image_translation")
# %% tags=["solution"]
# `top_dir` points directly at the data folder (training/, test/,
# pretrained_models/).
# #######################
# ##### SOLUTION ########
# #######################
top_dir = Path("/mnt/efs/dl_jrc/data/04_image_translation")
# %%
# Derived paths. `top_dir` must point at the folder containing training/,
# test/, and pretrained_models/.
data_path = top_dir / "training/a549_hoechst_cellmask_train_val.zarr"
# Path where we will save our training logs
training_top_dir = Path(f"{os.getcwd()}/data/")
# Create top_training_dir directory if needed, and launch tensorboard
training_top_dir.mkdir(parents=True, exist_ok=True)
log_dir = training_top_dir / "04_image_translation/logs/"
# Create log directory if needed, and launch tensorboard
log_dir.mkdir(parents=True, exist_ok=True)
if not data_path.exists():
raise FileNotFoundError(
f"Data not found at {data_path}. Please check the top_dir and data_path variables."
)
# %% [markdown] tags=[]
# The next cell starts tensorboard.
# <div class="alert alert-warning">
# If you launched jupyter lab from ssh terminal, add <code>--host <your-server-name></code> to the tensorboard command below. <code><your-server-name></code> is the address of your compute node that ends in amazonaws.com.
# </div>
# %% tags=[]
# Visualization and TensorBoard helpers (live in utils.py to keep this
# notebook focused on the machine learning content). Open utils.py if you
# want to see how each helper renders its inputs.
from utils import (
BOP_BLUE,
BOP_ORANGE,
GREEN,
MAGENTA,
clip_highlight,
clip_p,
composite_nuc_mem,
launch_tensorboard,
log_batch_jupyter,
log_batch_tensorboard,
process_image,
)
# Launch tensorboard and click on the link to view the logs.
tensorboard_process = launch_tensorboard(log_dir)
# %% [markdown] tags = []
# <div class="alert alert-warning">
# If you are using VSCode and a remote server, you will need to forward the port to view the tensorboard. <br>
# Take note of the port number was assigned in the previous cell.(i.e <code> http://localhost:{port_number_assigned}</code>) <br>
# Locate the your VSCode terminal and select the <code>Ports</code> tab <br>
# <ul>
# <li>Add a new port with the <code>port_number_assigned</code>
# </ul>
# Click on the link to view the tensorboard and it should open in your browser.
# </div>
# %% [markdown] tags=[]
# ## Load OME-Zarr Dataset
#
# **OME-Zarr** is a chunked, cloud-friendly microscopy format; **HCS layout**
# nests the zarr store like a physical plate — `row/col/field/level/T/C/Z/Y/X` —
# so each FOV is addressable by `dataset[f"{row}/{col}/{field}/{level}"]` and
# returns an `(T, C, Z, Y, X)` array.
#
# This dataset has 24 FOVs of 2048×2048 images across 3 channels (QPI, nuclei
# stained with DAPI, membrane stained with Cellmask), four pyramid levels
# (`0` = 2048×2048, `1` = 1024×1024, `2` = 512×512, `3` = 256×256), and a single
# time point. Pyramid levels let you preview a whole FOV cheaply at low
# resolution before zooming in to full resolution for training/inference.
# %% [markdown]
# 
#
# *Figure 2 from Moore et al. (2023), "OME-Zarr: a cloud-optimized bioimaging
# file format with international community support", Histochemistry and Cell
# Biology. Reproduced under [CC BY 4.0](https://creativecommons.org/licenses/by/4.0/).
# Article: https://link.springer.com/article/10.1007/s00418-023-02209-1*
# %% [markdown] tags=[]
# <div class="alert alert-warning">
# You can inspect the tree structure by using your terminal:
# <code> iohub info -v "path-to-ome-zarr" </code>
# <br>
# More info on the CLI:
# <code>iohub info --help </code> to see the help menu.
# </div>
# %%
# This is the python function called by `iohub info` CLI command
print_info(data_path, verbose=True)
# Open and inspect the dataset.
dataset = open_ome_zarr(data_path)
# %% [markdown] tags=[]
# <div class="alert alert-info">
#
# ### Task 1.1
# Look at a couple different fields of view (FOVs) by changing the `field` variable.
# Check the cell density, the cell morphologies, and fluorescence signal.
# HINT: look at the HCS Plate format to see what your options are.
# </div>
# %% tags=[]
# Use the field below to visualize data. Pyramid levels are shown side-by-side
# (0 = full resolution, larger = downsampled previews).
row = 0
col = 0
field = 9 # TODO: Change this to explore data.
# `channel_names` is the metadata that is stored with data according to the OME-NGFF spec.
n_channels = len(dataset.channel_names)
# Per-channel colormaps for the standard fluorescence-microscopy convention:
# phase as grayscale, nuclei in green, membrane in magenta.
channel_cmaps = {
"Phase3D": Colormap("gray").to_mpl(),
"Nucl": Colormap("green").to_mpl(),
"Mem": Colormap("magenta").to_mpl(),
}
default_cmap = Colormap("gray").to_mpl()
# Enumerate the pyramid levels for this FOV via iohub's Position.images().
# Each level is the same FOV downsampled (2048 -> 1024 -> 512 -> 256 in YX),
# not a smaller crop of the full-resolution data.
position = dataset[f"{row}/{col}/{field}"]
pyramid_levels = [(path, arr) for path, arr in position.images()]
print(f"FOV: {field}, pyramid levels: {[p for p, _ in pyramid_levels]}")
figure, axes = plt.subplots(
len(pyramid_levels),
n_channels,
figsize=(n_channels * 3, len(pyramid_levels) * 3),
squeeze=False,
)
for level_idx, (level_path, level_arr) in enumerate(pyramid_levels):
image = np.asarray(level_arr)
print(f" level {level_path}: shape={image.shape}")
for ch_idx in range(n_channels):
# Display the central z-slice so every level uses the same focal plane.
z_index = image.shape[2] // 2
channel_image = image[0, ch_idx, z_index]
# Adjust contrast to 0.5th and 99.5th percentile of pixel values.
p_low, p_high = np.percentile(channel_image, (0.5, 99.5))
channel_image = np.clip(channel_image, p_low, p_high)
ax = axes[level_idx, ch_idx]
ax.imshow(
channel_image,
cmap=channel_cmaps.get(dataset.channel_names[ch_idx], default_cmap),
)
ax.axis("off")
ax.set_title(
f"{dataset.channel_names[ch_idx]} — level {level_path} "
f"({channel_image.shape[0]}×{channel_image.shape[1]})"
)
plt.tight_layout()
# %% [markdown] tags=[]
# ## Explore the effects of augmentation on batch.
#
# Time to meet the first of the three Lightning objects from the primer above: the
# **DataModule**. `HCSDataModule` is VisCy's `LightningDataModule` — it knows how
# to read an OME-Zarr store, split FOVs into train/val, apply normalization and
# augmentations, and hand the Trainer a PyTorch `DataLoader`. You configure it
# once; Lightning calls the right method (`train_dataloader()`,
# `val_dataloader()`, etc.) at the right time.
#
# Every sample `HCSDataModule` yields is a Python `dict` (not a tuple) with:
#
# - `source`: the input image, a tensor of shape `(1, 1, Y, X)` → `(C, Z, Y, X)`
# - `target`: the target image, a tensor of shape `(2, 1, Y, X)` → `(C, Z, Y, X)`
# - `index` : the tuple `(HCS location, time, z-slice)` identifying the sample
#
# A `batch` is a dict of the same keys with an extra leading batch dimension, e.g.
# `batch["source"].shape == (B, 1, 1, Y, X)`. The `training_step` method inside
# `VSUNet` receives this dict directly — no unpacking required.
# %% [markdown] tags=[]
# ## A primer on augmentations and patch sizes
#
# You pass augmentations to `HCSDataModule` via the `augmentations=[...]`
# argument. They run on the **CPU**, inside each `DataLoader` worker, per
# sample, before the batch is collated and moved to the GPU. The chain runs in
# order, so the *last* transform in the list determines the final patch size
# the model sees.
#
# Two things to keep in mind when designing the chain:
#
# 1. **Some augmentations work better on a larger crop than the model's final
# input size.** A common pattern is "crop to 384×384, rotate, then
# center-crop to 256×256" — that way the rotation's black corners get
# cropped out before the model sees the patch. So you'll often want
# `RandWeightedCropd` (e.g. 384×384) → spatial / intensity transforms →
# `CenterSpatialCropd` (e.g. 256×256) at the end of the chain.
# 2. **`HCSDataModule` validates the final patch size.** Right before each
# training batch hits the model, it checks that the source spatial shape
# matches `(z_window_size, *yx_patch_size)`. If it doesn't, you'll get a
# `ValueError` telling you to add a spatial crop. Practically: whatever the
# last spatial-sizing transform produces must equal `yx_patch_size`.
#
# (Advanced: the data module also supports a `gpu_augmentations=[...]`
# argument that runs per-batch on the GPU after `on_after_batch_transfer`.
# We don't use it in this exercise — keeping everything CPU-side is simpler
# and is enough for this dataset.)
# %% [markdown] tags=[]
# <div class="alert alert-info">
#
# ### Task 1.2
# - Run the next cell to setup a logger for your augmentations.
# - Setup the `HCSDataloader()` in for training.
# - Configure the dataloader for the `"UNeXt2_2D"`
# - Configure the dataloader for the phase (source) to fluorescence cell nuclei and membrane (targets) regression task.
# - Configure the dataloader for training. Hint: use the `HCSDataloader.setup()`
# - Open your tensorboard and look at the `IMAGES tab`.
#
# Note: If tensorboard is not showing images or the plots, try refreshing and using the "Images" tab.
# </div>
# %% tags=["task"]
# Initialize the data module.
BATCH_SIZE = 16
# 4 is a perfectly reasonable batch size
# (batch size does not have to be a power of 2)
# See: https://sebastianraschka.com/blog/2022/batch-size-2.html
# #######################
# ##### TODO ########
# #######################
# HINT: Run dataset.channel_names
source_channel = ["TODO"]
target_channel = ["TODO", "TODO"]
# #######################
# ##### TODO ########
# #######################
data_module = HCSDataModule(
data_path,
z_window_size=1,
source_channel=source_channel,
target_channel=target_channel,
split_ratio=0.8,
batch_size=BATCH_SIZE,
num_workers=4,
yx_patch_size=(256, 256), # larger patch size makes it easy to see augmentations.
# Crop to yx_patch_size so the visualization batch is 256x256, not the
# full 2048x2048 FOV — otherwise this single un-augmented batch would
# pin several GB of GPU memory through the rest of the notebook.
# No random augmentations yet (rotations / noise / contrast come in
# Task 1.3).
augmentations=[
CenterSpatialCropd(
keys=source_channel + target_channel,
roi_size=(1, 256, 256),
),
],
normalizations=[], # Turn off normalization for now.
)
# #######################
# ##### TODO ########
# #######################
# Setup the data_module to fit. HINT: data_module.setup()
# Evaluate the data module
print(
f"Samples in training set: {len(data_module.train_dataset)}, "
f"samples in validation set:{len(data_module.val_dataset)}"
)
train_dataloader = data_module.train_dataloader()
# Instantiate the tensorboard SummaryWriter, logs the first batch and then iterates through all the batches and logs them to tensorboard.
writer = SummaryWriter(log_dir=f"{log_dir}/view_batch")
# Draw a batch and write to tensorboard.
batch = next(iter(train_dataloader))
log_batch_tensorboard(batch, 0, writer, "augmentation/none")
writer.close()
# %% tags=["solution"]
BATCH_SIZE = 16
# 4 is a perfectly reasonable batch size
# (batch size does not have to be a power of 2)
# See: https://sebastianraschka.com/blog/2022/batch-size-2.html
# #######################
# ##### SOLUTION ########
# #######################
source_channel = ["Phase3D"]
target_channel = ["Nucl", "Mem"]
# #######################
# ##### SOLUTION ########
# #######################
data_module = HCSDataModule(
data_path,
z_window_size=1,
source_channel=source_channel,
target_channel=target_channel,
split_ratio=0.8,
batch_size=BATCH_SIZE,
num_workers=4,
yx_patch_size=(256, 256), # larger patch size makes it easy to see augmentations.
# Crop to yx_patch_size so the visualization batch is 256x256, not the
# full 2048x2048 FOV — otherwise this single un-augmented batch would
# pin several GB of GPU memory through the rest of the notebook.
# No random augmentations yet (rotations / noise / contrast come in
# Task 1.3).
augmentations=[
CenterSpatialCropd(
keys=source_channel + target_channel,
roi_size=(1, 256, 256),
),
],
normalizations=[], # Turn off normalization for now.
)
# #######################
# ##### SOLUTION ########
# #######################
# Setup the data_module to fit. HINT: data_module.setup()
data_module.setup("fit")
# Evaluate the data module
print(
f"Samples in training set: {len(data_module.train_dataset)}, "
f"samples in validation set:{len(data_module.val_dataset)}"
)
train_dataloader = data_module.train_dataloader()
# Instantiate the tensorboard SummaryWriter, logs the first batch and then iterates through all the batches and logs them to tensorboard.
writer = SummaryWriter(log_dir=f"{log_dir}/view_batch")
# Draw a batch and write to tensorboard.
batch = next(iter(train_dataloader))
log_batch_tensorboard(batch, 0, writer, "augmentation/none")
writer.close()
# %% [markdown] tags=[]
# <div class="alert alert-warning">
#
# ### Questions
# 1. What are the two channels in the target image?
# 2. How many samples are in the training and validation set? What determined that split?
#
# Note: If tensorboard is not showing images, try refreshing and using the "Images" tab.
# </div>
# %% [markdown] tags=[]
# If your tensorboard is causing issues, you can visualize directly on Jupyter /VSCode
# %%
# Visualize in Jupyter
log_batch_jupyter(batch, dataset.channel_names)
# %% [markdown] tags=[]
# <div class="alert alert-warning">
# <h3> Question for Task 1.3 </h3>
# 1. How do they make the model more robust to imaging parameters or conditions
# without having to acquire data for every possible condition? <br>
# </div>
# %% [markdown] tags=["solution"]
# Each augmentation simulates a real-world source of microscope-to-microscope
# variation so the model doesn't overfit to the training conditions:
#
# | Transform | Simulates |
# | --- | --- |
# | `RandWeightedCropd` | random crops biased toward signal-dense regions (foreground oversampling) |
# | `RandAffined` | stage rotation, scale drift, slight shear between acquisitions |
# | `RandAdjustContrastd` | illumination / exposure differences |
# | `RandScaleIntensityd` | gain / brightness differences between cameras |
# | `RandGaussianNoised` | shot and read noise at different detector settings |
# | `RandGaussianSmoothd` | small focus drift / defocus |
# %% [markdown] tags=[]
# <div class="alert alert-info">
#
# ### Task 1.3
# Add the following augmentations:
# - Add augmentations to rotate about $\pi$ around z-axis, 30% scale in (y,x),
# shearing of 1% in (y,x), and no padding with zeros with a probability of 80%.
# - Add a Gaussian noise with a mean of 0.0 and standard deviation of 0.3 with a probability of 50%.
#
# HINT: `RandAffined()` and `RandGaussianNoised()` are MONAI dictionary
# transforms re-exported from `viscy_transforms`. See the MONAI docs for
# arguments and probability semantics:
# [RandAffined](https://docs.monai.io/en/stable/transforms.html#randaffined),
# [RandGaussianNoised](https://docs.monai.io/en/stable/transforms.html#randgaussiannoised).
# You can also inspect any transform in a cell with `RandAffined?`.<br><br>
# [Compare your choice of augmentations against the pretrained models and config files](https://github.com/mehta-lab/VisCy/releases/download/v0.1.0/VisCy-0.1.0-VS-models.zip).
#
# <br><br>
# <b>Question:</b> Once you run the next cell, notice the black corners
# in the rotated patches. Where do they come from, and how can you make
# sure the model never sees them? (Hint: look at the
# <code>padding_mode</code> kwarg in <code>RandAffined</code>, and compare
# the patch size you visualize here with <code>yx_patch_size</code>. The
# last transform in the augmentation chain determines what the model
# actually receives — what should that transform be?)
# </div>
# %% tags=["task"]
# Here we turn on data augmentation and rerun setup
# #######################
# ##### TODO ########
# #######################
# HINT: Run dataset.channel_names
source_channel = ["TODO"]
target_channel = ["TODO", "TODO"]
augmentations = [
RandWeightedCropd(
keys=source_channel + target_channel,
spatial_size=(1, 384, 384),
num_samples=2,
w_key=target_channel[0],
),
# #######################
# ##### TODO ########
# #######################
## TODO: Add Random Affine Transorms
## Write code below
# #######################
RandAdjustContrastd(keys=source_channel, prob=0.5, gamma=(0.8, 1.2)),
RandScaleIntensityd(keys=source_channel, factors=0.5, prob=0.5),
# #######################
# ##### TODO ########
# #######################
## TODO: Add Random Gaussian Noise
## Write code below
# #######################
RandGaussianSmoothd(
keys=source_channel,
sigma_x=(0.25, 0.75),
sigma_y=(0.25, 0.75),
sigma_z=(0.0, 0.0),
prob=0.5,
),
# #######################
# ##### TODO ########
# #######################
## TODO: Add a CenterSpatialCropd
## Write code below
# #######################
]
normalizations = [
NormalizeSampled(
keys=source_channel,
level="fov_statistics",
subtrahend="mean",
divisor="std",
),
NormalizeSampled(
keys=target_channel,
level="fov_statistics",
subtrahend="median",
divisor="iqr",
),
]
data_module.augmentations = augmentations
data_module.normalizations = normalizations
data_module.setup("fit")
# get the new data loader with augmentation turned on
augmented_train_dataloader = data_module.train_dataloader()
# Draw batches and write to tensorboard
writer = SummaryWriter(log_dir=f"{log_dir}/view_batch")
augmented_batch = next(iter(augmented_train_dataloader))
log_batch_tensorboard(augmented_batch, 0, writer, "augmentation/some")
writer.close()
# %% tags=["solution"]
# #######################
# ##### SOLUTION ########
# #######################
source_channel = ["Phase3D"]
target_channel = ["Nucl", "Mem"]
augmentations = [
RandWeightedCropd(
keys=source_channel + target_channel,
spatial_size=(1, 384, 384),
num_samples=2,
w_key=target_channel[0],
),
# #######################
# ##### SOLUTION ########
# #######################
RandAffined(
keys=source_channel + target_channel,
rotate_range=[3.14, 0.0, 0.0],
scale_range=[0.0, 0.3, 0.3],
prob=0.8,
padding_mode="zeros",
shear_range=[0.0, 0.01, 0.01],
),
RandAdjustContrastd(keys=source_channel, prob=0.5, gamma=(0.8, 1.2)),
RandScaleIntensityd(keys=source_channel, factors=0.5, prob=0.5),
# #######################
# ##### SOLUTION ########
# #######################
RandGaussianNoised(keys=source_channel, prob=0.5, mean=0.0, std=0.3),
RandGaussianSmoothd(
keys=source_channel,
sigma_x=(0.25, 0.75),
sigma_y=(0.25, 0.75),
sigma_z=(0.0, 0.0),
prob=0.5,
),
# #######################
# ##### SOLUTION ########
# #######################
# Final center crop down to yx_patch_size. The rotated 384x384 patch has
# black corners from RandAffined's zero padding; cropping to the central
# 256x256 removes them before the patch reaches the model. Without this
# last step HCSDataModule raises a ValueError in on_after_batch_transfer.
CenterSpatialCropd(
keys=source_channel + target_channel,
roi_size=(1, 256, 256),
),
]
normalizations = [
NormalizeSampled(
keys=source_channel,
level="fov_statistics",
subtrahend="mean",
divisor="std",
),
NormalizeSampled(
keys=target_channel,
level="fov_statistics",
subtrahend="median",
divisor="iqr",
),
]
data_module.augmentations = augmentations
# Setup the data_module to fit. HINT: data_module.setup()
data_module.setup("fit")
# get the new data loader with augmentation turned on
augmented_train_dataloader = data_module.train_dataloader()
# Draw batches and write to tensorboard
writer = SummaryWriter(log_dir=f"{log_dir}/view_batch")
augmented_batch = next(iter(augmented_train_dataloader))
log_batch_tensorboard(augmented_batch, 0, writer, "augmentation/some")
writer.close()
# %% [markdown] tags=[]
# <div class="alert alert-warning">
# <h3> Question for Task 1.3 </h3>
# 1. Look at your tensorboard. Can you tell the agumentations were applied to the sample batch? Compare the batch with and without augmentations. <br>
# 2. Are these augmentations good enough? What else would you add?
# </div>
# %% [markdown]
# Visualize directly on Jupyter
# %%
log_batch_jupyter(augmented_batch, dataset.channel_names)
# %% [markdown] tags=[]
# ## Train a 2D U-Net model to predict nuclei and membrane from phase.
# ### Constructing a 2D UNeXt2 using VisCy
#
# Now we meet the second Lightning object: the **`LightningModule`**. `VSUNet` is
# VisCy's `LightningModule` and it bundles three things that plain PyTorch keeps
# separate:
#
# 1. **The network** — a UNeXt2 architecture, configured through `model_config`.
# 2. **The loss** — passed in as `loss_function=MixedLoss(...)`. VisCy's
# `MixedLoss` is a single class with knobs for L1, L2/MSE, and MS-DSSIM.
# For this exercise we'll train with pure MSE (`l2_alpha=1.0`); the
# pretrained checkpoint we compare against in Part 2 was trained with
# a mix of L1 + MS-DSSIM.
# 3. **The per-batch logic** — `training_step` and `validation_step` methods that
# take one `{"source", "target"}` batch, run the forward pass, compute the
# loss, and return it. You don't see these methods here because they're
# defined once inside `VSUNet`; Lightning calls them for you.
#
# Other constructor arguments you'll recognize from plain PyTorch training:
# `lr` is the learning rate, `schedule="WarmupCosine"` picks the LR schedule,
# and `freeze_encoder=False` lets gradients flow through the whole network.
# `log_batches_per_epoch` is a VisCy extra — it tells the module how many image
# samples to push to TensorBoard each epoch.
# %% [markdown]
# **Architecture config** — UNeXt2 is a U-Net with ConvNeXt-style blocks:
#
# - `encoder_blocks=[3, 3, 9, 3]` and `dims=[96, 192, 384, 768]` — 4 downsampling
# stages with that many blocks and feature channels per stage (last stage is
# the bottleneck). More blocks / dims = more capacity and more compute.
# - `decoder_conv_blocks=2` — conv blocks after each upsampling step.
# - `stem_kernel_size=(1, 2, 2)` and `in_stack_depth=1` — this is a 2D model,
# so we use 1 z-slice and a stem that doesn't convolve across z.
#
# **Loss** — `MixedLoss(l2_alpha=1.0)` is plain MSE (mean squared error) on
# the predicted vs target fluorescence — the most familiar regression loss,
# and a good baseline for image translation.
#
# Once your model trains, try swapping the loss with
# `MixedLoss(l1_alpha=0.5, ms_dssim_alpha=0.5)` (per-pixel L1 + multi-scale
# SSIM). L1 + MS-DSSIM is what the pretrained VSCyto2D checkpoint we
# compare against in Part 2 was trained with, and produces visibly sharper
# membrane edges than MSE alone.
#
# **Schedule** — `schedule="WarmupCosine"`, `lr=6e-4`: the learning rate ramps
# up from 0 over the first few epochs (warmup), then follows a cosine decay
# toward 0. Warmup lets AdamW's adaptive step-size estimates stabilize before
# taking large steps, preventing early training instability; cosine decay is a
# strong default for vision transformer / ConvNeXt-style encoders.
# %% [markdown]
# <div class="alert alert-info">
#
# ### Task 1.4
# - Run the next cell to instantiate the `UNeXt2_2D` model
# - Configure the network for the phase (source) to fluorescence cell nuclei and membrane (targets) regression task.
# - Call the VSUNet with the `"UNeXt2_2D"` architecture.
# - Run the next cells to instantiate data module and trainer.
# - Add the source channel name and the target channel names
# - Start the training <br>
#
# <b> Note </b> <br>
# See ``viscy.translation.engine.VSUNet`` ([source code](https://github.com/mehta-lab/VisCy/blob/main/viscy/translation/engine.py)) and ``viscy.unet.networks.fcmae`` ([source code](https://github.com/mehta-lab/VisCy/blob/main/viscy/unet/networks/fcmae.py)) to learn more about the configuration parameters and FCMAE architecture.
# </div>
# %% tags=["task"]
# Create a 2D UNet.
GPU_ID = 0
BATCH_SIZE = 16
YX_PATCH_SIZE = (256, 256)
# #######################
# ##### TODO ########
# #######################
# Dictionary that specifies key parameters of the model.
phase2fluor_config = dict(
in_channels=..., # TODO how many input channels are we feeding Hint: int?,
out_channels=..., # TODO how many output channels are we solving for? Hint: int,
encoder_blocks=[3, 3, 9, 3],
dims=[96, 192, 384, 768],
decoder_conv_blocks=2,
stem_kernel_size=(1, 2, 2),
in_stack_depth=..., # TODO: was this a 2D or 3D input? HINT: int,
pretraining=False,
)
# #######################
# ##### TODO ########
# #######################
phase2fluor_model = VSUNet(
architecture=..., # TODO: 2D UNeXt2 architecture
model_config=phase2fluor_config.copy(),
loss_function=MixedLoss(l1_alpha=0.0, l2_alpha=1.0, ms_dssim_alpha=0.0),
schedule="WarmupCosine",
lr=6e-4,
log_batches_per_epoch=5, # Number of samples from each batch to log to tensorboard.
freeze_encoder=False,
)
# #######################
# ##### TODO ########
# #######################
# HINT: Run dataset.channel_names
source_channel = ["TODO"]
target_channel = ["TODO", "TODO"]
# Setup the data module.
# NOTE: the `augmentations` chain you build above must end with a
# CenterSpatialCropd that brings patches down to yx_patch_size. HCSDataModule
# validates this and will raise ValueError if the
# final source shape doesn't match the model's expected input shape.
phase2fluor_2D_data = HCSDataModule(
data_path,
source_channel=source_channel,
target_channel=target_channel,
z_window_size=1,
split_ratio=0.8,
batch_size=BATCH_SIZE,
num_workers=4,
yx_patch_size=YX_PATCH_SIZE,
augmentations=augmentations,
val_augmentations=[
CenterSpatialCropd(
keys=source_channel + target_channel,
roi_size=(1, YX_PATCH_SIZE[0], YX_PATCH_SIZE[1]),
),
],
normalizations=normalizations,
)
phase2fluor_2D_data.setup("fit")
# fast_dev_run runs a single batch of data through the model to check for errors.
trainer = VisCyTrainer(
accelerator="gpu", devices=[GPU_ID], precision="16-mixed", fast_dev_run=True
)
# trainer class takes the model and the data module as inputs.
trainer.fit(phase2fluor_model, datamodule=phase2fluor_2D_data)
# %% tags=["solution"]
# Here we are creating a 2D UNet.
GPU_ID = 0
BATCH_SIZE = 16
YX_PATCH_SIZE = (256, 256)
# Dictionary that specifies key parameters of the model.
# #######################
# ##### SOLUTION ########
# #######################
phase2fluor_config = dict(
in_channels=1,
out_channels=2,
encoder_blocks=[3, 3, 9, 3],
dims=[96, 192, 384, 768],
decoder_conv_blocks=2,
stem_kernel_size=(1, 2, 2),
in_stack_depth=1,
pretraining=False,
)
phase2fluor_model = VSUNet(
architecture="UNeXt2_2D", # 2D UNeXt2 architecture
model_config=phase2fluor_config.copy(),
loss_function=MixedLoss(l1_alpha=0.0, l2_alpha=1.0, ms_dssim_alpha=0.0),
schedule="WarmupCosine",
lr=6e-4,
log_batches_per_epoch=5, # Number of samples from each batch to log to tensorboard.
freeze_encoder=False,
)
# ### Instantiate data module and trainer, test that we are setup to launch training.
# #######################
# ##### SOLUTION ########
# #######################
# Selecting the source and target channel names from the dataset.
source_channel = ["Phase3D"]
target_channel = ["Nucl", "Mem"]
# Setup the data module.
# NOTE: the `augmentations` chain above ends with a CenterSpatialCropd that
# brings patches down to yx_patch_size before the batch reaches the model.
# HCSDataModule validates this in on_after_batch_transfer.
phase2fluor_2D_data = HCSDataModule(
data_path,
source_channel=source_channel,
target_channel=target_channel,
z_window_size=1,
split_ratio=0.8,
batch_size=BATCH_SIZE,
num_workers=4,
yx_patch_size=YX_PATCH_SIZE,
augmentations=augmentations,
val_augmentations=[
CenterSpatialCropd(
keys=source_channel + target_channel,
roi_size=(1, YX_PATCH_SIZE[0], YX_PATCH_SIZE[1]),
),
],
normalizations=normalizations,
)
# #######################
# ##### SOLUTION ########
# #######################
phase2fluor_2D_data.setup("fit")
# --- The third Lightning object: the Trainer ---
#
# This is the object that replaces the hand-written training loop. Each kwarg
# controls one piece of the boilerplate Lightning is handling for you:
#
# - accelerator="gpu", devices=[GPU_ID]
# Pick the device. No more ".to(device)" sprinkled through your code —
# Lightning moves model + every batch for you.
# - precision="16-mixed"
# Automatic mixed-precision training (fp16 activations, fp32 master
# weights). Cuts GPU memory roughly in half and speeds up matmuls on
# modern GPUs — no autocast() context managers needed.
# - fast_dev_run=True
# Sanity check: run ONE training batch + ONE validation batch and exit.
# Use this on every new pipeline to catch shape bugs, NaN losses, or
# bad paths *before* you commit to a multi-hour training job.
#
# trainer.fit(model, datamodule=...) then drives the whole thing: it calls
# datamodule.setup(), pulls batches from train_dataloader(), invokes
# model.training_step(batch), runs loss.backward() + optimizer.step() +
# zero_grad(), runs validation, logs to TensorBoard, and saves checkpoints.
trainer = VisCyTrainer(
accelerator="gpu", devices=[GPU_ID], precision="16-mixed", fast_dev_run=True
)
trainer.fit(phase2fluor_model, datamodule=phase2fluor_2D_data)
# %% [markdown] tags=[]
# ## View model graph.
#
# PyTorch uses dynamic graphs under the hood.
# The graphs are constructed on the fly.
# This is in contrast to TensorFlow,
# where the graph is constructed before the training loop and remains static.